|
24/7 free support help and order line 603-435-7199 No sales tax (New Hampshire Location where winter snow and ice rot everything!) |
![]()
Buy With Confidence when buying rot repair resins
PROGRESSIVE EPOXY POLYMERS, INC.
GOOGLE SITE SEARCH - Click here
Nothing but Quality Products at Good Prices, Great Customer Service, and Lots and Lots of Helpful Information
and NO SALES TAX - You are shopping in TAX FREE New Hampshire
|
WHO ARE WE? Watch our short 2-minute Progressive Epoxy Polymers video |
EPOXY WOOD ROT REPAIR
"The Right Epoxy Fixes Darn Near Everything!"
We are the only technology based coating/epoxy/resin company that actively encourages your phone calls, not just during our East Coast work hours but also after/before hours, evening, weekends and even holidays. We're available when you are. We form a personal relationship with our customers and freely share technical information, how to-advice, product information and tips-and-tricks. Speak with a non-salesman technical professional with over 25 years of experience in the resin/coating/epoxy industry (no newbie staffer on the phone lines!). Floors, tables, boats, leaks, rot repair. We handle it all! We are an 'always available,' one-on-one, technical/scientific, coating company (watch our video). We are NOT one of those fluffy/slick mass sales firms the dominate the internet selling cheap third party (made in China???), low end epoxies and coatings with no real knowledge of what they are selling and quotas to sell to as many people as possible. 603-435-7199 (east coat time).
You're talking with: Paul Oman, MS, MBA -- Member since 1994: NACE (National Assoc. of Corrosion Engineers), SSPC (Soc. of Protective Coatings) FORMER SAILING INSTRUCTOR -- Technical Help - not sales talk!
"If you have knowledge, let others light their candles in it." -- Margaret Fuller, Journalist
|
24/7 free support help and order line 603-435-7199 No sales tax (New Hampshire Location where winter snow and ice rot everything!) |
![]()
Buy With Confidence when buying rot repair resins
ABSOLUTE BEST SOURCE for epoxy information, options, USA made products, 24/7/365 help, and support
(always available! EMAIL 603 435 7199)
WHAT THIS SITE COVERS:
The sad truth about epoxy and wet rotten wood
How do you treat wood rot?
Step by step DIY repair of a rotten window sill
Log cabin epoxy repair
Using anti-freeze to treat rot
Useful wood rot related links
Links to 3rd party YouTube Rot Repair Videos and more
Treat your exterior rot before it gets covered in winter snow and ice. You have options. Call if you want to discuss 603 -435 7199
(Leaky basement? CLICK HERE)
Repairing Wood Rot - DIY Window
Epoxy Repair Log Cabins
Wood Rot Repair with epoxy products
|
Let's stay connected. It's a win-win situation. Receive our online NEWSLETTER by emailing us your name and email address. |
Your Host and Tour Guide:
Paul Oman, MS, MBA - Progressive Epoxy Polymers, Inc. (floor epoxies, marine epoxies, underwater epoxies, repair epoxies)
Member: NACE (National Assoc. of Corrosion Engineers), SSPC (Soc. of Protective Coatings)
Board member: Friends of the Suncook River - 501(c)(3) non profit ----- Founder: Friday Night Paddlers .
"Professionals helping Professionals since 1994"
PROGRESSIVE EPOXY POLYMERS, INC.
|
PAGE AND SITE NAVIGATION |
|||||||||||||||||
Epoxy Repair Links Page ====> This is an DIY epoxy repair 'Linked To' Sub-Page
No Sales Tax applied. Save Money, you're shopping in Tax Free New Hampshire
MEMBER: Internet Epoxy Confederation (IEC - CLICK HERE TO VISIT) -- "Where Professionalism Still Matters"
We've been selling epoxy - marine epoxy (boat building - wood / fiberglass repair) industrial coatings - garage paint - underwater epoxies - thick putties - tabletop resins and supplies since the early 1990's |
WARNING: Don't buy epoxy from any source that doesn't have batch numbers or Date of Manufacture stamped on to their products labels.. Like all primary source manufacturers and vendors, we track each each unit with a batch number or manufacturing date hand added to each container label. It is a labor intensive, hands-on process that marketing based companies and firms that just want to push product and take your money don't do. Most (maybe all) of out competitors don't track or provide this information. They don't know it, or they don't want to let you know how old their product is. Only buy your epoxy chemicals from vendors that label their epoxies with actual batch numbers or Date of Manufacture. Call before ordering and ask if that information will be on all containers shipped out.
|
AN OFFER YOU SHOULD NOT REFUSE LET'S TALK ROT Before you buy anything from anyone, we HIGHLY SUGGEST you CALL 603-435-7199 OR EMAIL US (24/7/365 - except for Sunday morning church fellowship). Let's make sure you have the right products for the job, an understanding of how to use them and a feel for what might go wrong. Lets talk window sills or log cabin walls and log ends And if you purchase our products feel free to CALL OR EMAIL US again (24/7/365) before you use them for "tips and tricks" or just some "hand-holding." Perhaps when you're done you'll let us put up some of our pictures on our web site. We have much more information, customer stories, anecdotes, etc. we can share that are not on this web page but might be helpful to you. Email us with your phone # (or call us direct) and we will chat on the phone. You should know your vendor and we want to know our customers. DIRECT EMAIL LINK (CLICK HERE) Most people are not sure what product or products they need to use, how much product they need, and what to expect when using those product(s). You cannot get that from just reading a web site and most web sites just want you to order their product on-line and then go away. We're different. Please call or email us so that your project goes smoothly and it is Win-Win for everyone. Call the vendor of any 'rot' repair product (especially on weekends and after-hours). Will they answer or call back? Can they talk 'rot' or just talk about their product?
"You provide outstanding products, and Fantastic Support. Thank You." Brian S. "Thanks for all your advice, tips & moral support concerning my project. It turned out beautiful. Quality people backing a quality product is the only way to go!" Joe
You're talking with: Paul Oman, MS, MBA -- Member since 1994: NACE (National Assoc. of Corrosion Engineers), SSPC (Soc. of Protective Coatings) -- Technical Help - not sales talk! |
|
|
"Paul, you have outstanding products. Every product has out performed the highly advertised units I purchased elsewhere for past projects. Thank you." (Dick - email 11/10/13) |
|
"OK...thanks for the personal touch. And for such an informative website. The navigation took me a while to grasp, but I really appreciate all the credible, helpful information you provide. This is my 3rd or 4th order over the years and I give you a A or A+ grade on all of it. I'm a nit-picking former Polaris nuclear missile targeting and firing guy so you don't get a good grade from me unless you are on target!" -- Dave 7/14 |
|
|
Buy With Confidence |
|
BBB Certified Approved vendor
|
Always find/confirm Better Bus. Bureau accreditation when buying online. If they have it, they would show it! |
|
member (Paul Oman MS MBA) |
NACE (Nat Assoc Corrosion Engineers) |
|
member (Paul Oman MS MBA) |
SSPC (Soc of Protective Coatings) |
|
Like Us On |
|
|
Like Us On |
|
|
Don't be fooled by slick and flashy websites designed by marketing firms and web designers |
|
|
QUESTIONS? READY TO ORDER? |
EMAIL OR CALL 603 435 7199 - ORDER ONLINE |
There are lots of rot repair pages and epoxy products available. The attempt on this page is to put it all in perspective,
outline the general basics and theories, and than (of course), mention the products we sell.
THE SAD TRUTH
Despite claims by many companies, epoxy sealers, penetrating epoxies, etc. will not fix, damp/wet rotted wood.
The epoxy may or may not bond to the wet wood (some epoxies bond to wet surfaces) but it will not 'drive the dampness
out of the wood' and replace it with hard epoxy. At best the epoxy will stick the the wet rot surface, still leaving
the 'water' seemingly 'attached' to the wood.
You will note that penetrating epoxy claims are always done with dry sawdust type rot, the type of surface where any liquid will soak into the material. The material in the epoxy that helps it soak into the fibers is generally a traditional solvent. Some products are actually upwards of 70% solvent and only 30% epoxy (which costs more than solvent). I believe 70% epoxy and 30% solvent is a better ratio.
I have tried several times to epoxy 'fix' spongy, soft rotten wood spots on my outdoor porch deck. I've tried all the tricks, and at best I get a hard crust over the area. Still not satisfied, I've always ended up ripping out the old planking and replacing it with new. And I've also found that the rot on the bottom side of the blank was much more extensive than the patch of soft rot on the top side of the plank and that that the 'penetrating' epoxy never got to more than about 5% of the problem.
Window sills, trim work etc. are a different story. They are small areas and no one is walking on them, so it doesn't really matter too much of the fix is not 100%. The goal often is not so much to completely remove the rot as it is to stabilize the surface so that it will coat a coat of paint. Also porch deck planks are easy to remove and easy to drop a new one in its place. Window sills and outdoor trim are a different matter. Replacing or matching them is often more time, money, or skill than most of us have, so that best we can usually do is just a 'decent' patch.
So, the steps below are the results of personal experience and feedback from customers. There are certainly no
right or wrong ways but the method explained below, seems to a good one.
Epoxy Only Web Google Search
#1) Google
Everything Epoxy Searches
#2) Google
Marine Epoxies Searches
#3)Google
Floor Epoxy Searches View
our Progressive Epoxy Products, Inc.

OPTIONAL PRE-TREATMENTS OF ROTTED WOOD
Optional (at this point) - find the rot and remove as much of it as you can.
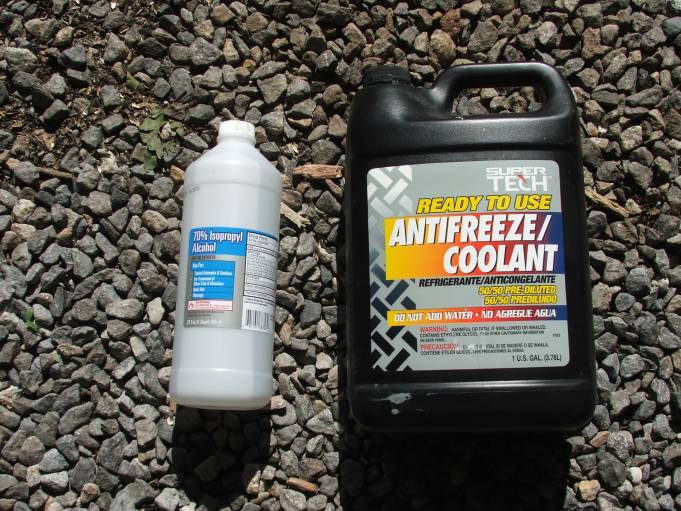
Option 1) - some people treat the area with glycol (anti-freeze) or boric/acid-salts to kill the fungus spores.
(NOTE: This is optional - the epoxy will kill the fungus spores to, but will not 'soak' in as well as the other
'fixes - including 'anti-freeze' see below. There is some concern about bonding to anti-freeze coated surfaces.
In personal tests, I found that anti-freeze penetrated the wood better than anything I have seen (it is attracted to moisture unlike other 'chemicals'). - try it yourself, put a piece of new yellow wood into some anti-freeze and watch the 'stain' migrate through the wood over the next few days. I also found that solvent thinned epoxies stick OK to anti-freeze coated wood and unthinned epoxies will stick decently enough too.
The method is to keep soaking the area with anti-freeze until it will accept no more and then let it 'dry' for as long as possible. This method does have a track record for stopping the rot.
For a third party article on anti-freeze (glycol) use with rotted wood try these links - ( article #1 (treating rotten wood) - (article #2 (more on treating rotted wood) -
Option 2) - treat the area with isopropyl alcohol. The alcohol is a solvent that will 'mix' with the water and
evaporates much quicker than water. Thus the evaporating alcohol will carry with it some of the dampness/wetness
in the wood. I suppose the alcohol might also kill some of the rot fungus.
Option 3) - cannot say I have tried it, but I suppose heat lamps etc. would help drive out the moisture and water
in the rot area. The drier would would add in epoxy penetration. Also, if the wood were reheated just prior to
applying the epoxy, the cooling down wood will 'draw in' the epoxy (as the air contracts and cools) deeper into
the wood than if the wood were at room temperature. This 'apply to a cooling down surface' is not theory but a
well established and proven technique in a number of epoxy application situations.
In A Nutshell - rot repair1) remove the worst of the rotten wood2) saturate the wood with a thin epoxy (Low V or ESP 155) These products are Progressive Epoxy Polymers, Inc. best selling, favorite products. Visit our FAVORITES - 7 EPOXIES THAT WILL FIX ANYTHING web page at: epoxyproducts.com/favorites4u.html View other popular one-of-a-kind products.3) fill in the void space with thick epoxy, (Wet Dry 700) blocks of wood, foam, putty etc. This product is a Progressive Epoxy Polymers, Inc. best selling, favorite product. Visit our FAVORITES - 7 EPOXIES THAT WILL FIX ANYTHING web page at: epoxyproducts.com/favorites4u.html View other popular one-of-a-kind products.4) sand smooth5) seal the sanded top surface with more Low V or ESP 155 epoxy6) paint the surface
Top 7 List Of Reasons for Using Our Rot Repair Epoxies: 1) Special epoxy that will bond to damp surfaces 2) Epoxy contains Kevlar (tm) fibers for gap filling (Wet Dry 700) 3) 24/7 phone and email support (you don't even need to have purchased our products 603-435-7199) 4) Honest and complete info (pro and con) on this site. You get the FULL story. 5) Sold by an epoxy coating company and not a sales/marketing firm 6) Made in the USA 7) We appreciate your interest and thank you sincerely for your business!
|
|
Spongy (rot) Boat Deck Core |
||||||||||||||||||||||||||||||||||||||||||||||||||||||||||||||||||||||||
| "I used your low-v epoxy to reattach my deck to
it's core deck this year. A lot of the products on the market for
"flooding" a delaminated deck use watery-thin epoxy that is full of
thinners. They cure up gummy, or brittle, they shrink, and they seep
away from voids rather than filling them in. That low-v is thin enough
to flow _everywhere_ without the burden of all those thinners.
My strategy involved small hole-saw holes in a 1-foot polka-dot pattern, large enough to fit a crow-bar to lift up the top laminate a little, and then an array of smaller holes to make sure I had complete coverage. I'd lift a little laminate with the crow bar, pour in the low-v, and after a few minutes it would start pouring out of all the lower holes. I set weights down on the deck to squish it all together tightly after I was content that the entire area had been flooded. It was amazing the little holes that the Low-V would find and start dripping out of from below. I had to be very careful staging my drip-collection in the cabin as a result. The Low V epoxy is thin enough to flow everywhere, but thick enough to hold a nice film in place to bridge any high spots my weights hadn't eliminated. And no thinners to trap inside the deck. You've got to start marketing this stuff directly for "flooding" delaminated decks! My decks went from spongy soft to rock solid." Satisfied Customer 4/16
Why
Low
V
epoxy
is
the
BEST
in
its
class:
1.
Very
low
viscosity
for
a
solvent
free,
odorless
epoxy
2)
can
be
applied
to
wet
or
damp
surfaces
-
key
for
many
repair
jobs
3)
thin
with
solvent
or
thicken
with
fillers
4)
contains
no
nonyl
phenol
5)
strong
user
support
/
feedback
6)
24/7
support
|
||||||||||||||||||||||||||||||||||||||||||||||||||||||||||||||||||||||||
| Low V epoxy is solvent free, thin and bonds to wet or damp surfaces. Popular for all sorts of ROT repair and for sealing the floors (from chemicals) on Shipping Container sold to the public. |
|
|
WOW! 35% - 40% of all daily online or telephone orders are from existing customers. That's an amazing 'REPEAT CUSTOMER" number. |
|
603 - 435 - 7199 ANYTIME 24/7 FOR HELP OR ORDERS |
|
|
|
|
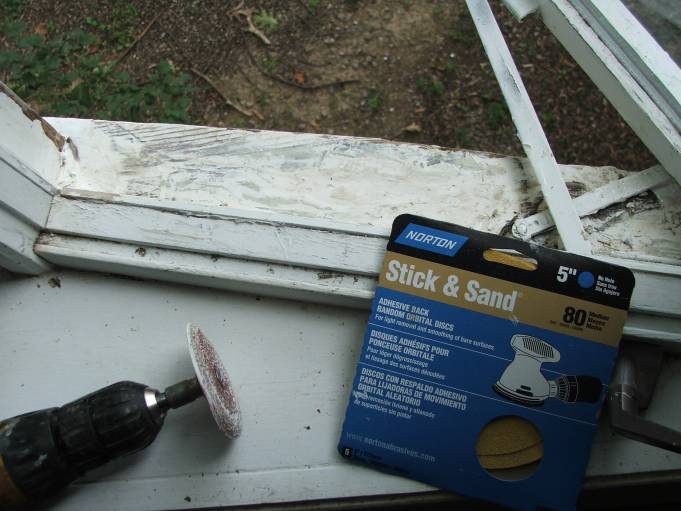
STEP 1
find the rot and remove as much of it as you can (if you haven't already). Let the wood dry as much as possible.
See pre-treatments above (you can optionally let wood dry naturally, use anti freeze, use alcohol, use heat)
STEP 2
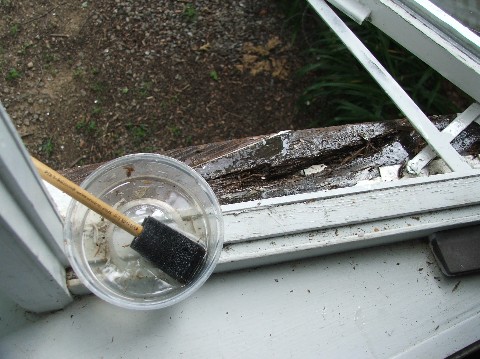
Seal and reinforce the wood with a 'solvent thinned' thin epoxy. Our ESP 155 epoxy is solvent thinned already. Our Low V epoxy is solvent free - you optionally add 0 - 100% solvent to it. Keep repeating this step until no more epoxy will soak into the wood.
Most folks opt for the Low V epoxy and may or may not decide to add solvent to it.
| Order Low V epoxy two part EPOXY Product NOW |
|
Why ESP 155 epoxy sealer and primer is the BEST in its class: 1) Uses superior CYCLOALIPHATIC curing agents and epoxy ADDUCT formulation 2) solvent based for better penetration 3) moisture tolerant, very low viscosity 4) strong user support / feedback 5) 24/7 support |
| THIS PRODUCT | xx | EMAIL US | xx | |
| air shippable | cycloaliphatic system | xx | ||
| no nonyl phenol | epoxy adduct system | xx | ||
| multi curing agents | bulk pricing | |||
| solvent free | no Calif. sales | xx | ||
| 2 part epoxy | xx | 2 part poly | ||
| apply underwater | bubble breakers | |||
| favorite(s) product list | xx | data sheets | xx | |
| PACKING - jugs/bottles | PACKING - cans | xx | ||
| find in non marine cat | xx | find in marine catalog | xx | |
| PRICES/ind/commercial | xx | PRICES/marine section | xx | |
| BUY online | BUY online | xx | ||
| home page | xx | contact page | xx |
STEP 3
If the chipped out bad area is large, some people recommend carving a wooden plug to fill up most of the space - thus saving epoxy and/or epoxy putty and incorporating more 'real wood' into the repair.
STEP 4
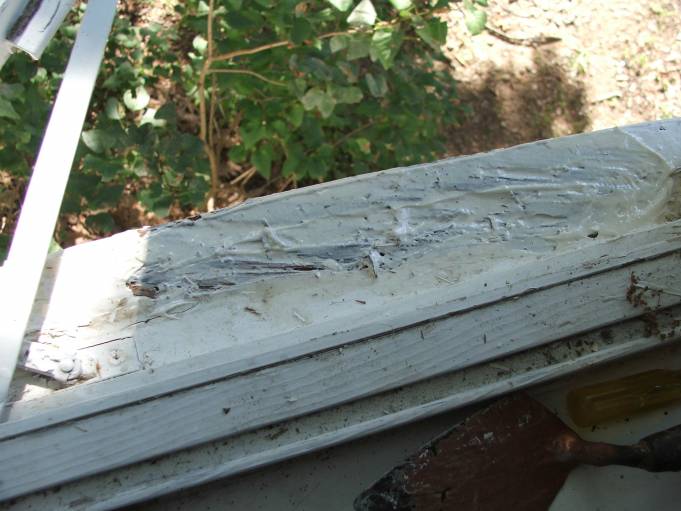
At this point you might fill the rot cavity with the chunk of wood and epoxy putty into place. Whether you use the wood plug or not, time to NEARLY FULL the cavity with epoxy putty. Use our Wet Dry 700 epoxy paste/putty or epoxy cream product. These epoxies will bond to damp surfaces (you can even apply it underwater!). You can also use our non solvent thinned Low V epoxy mentioned in Step 2 and our EZ Thick thickener to make an epoxy paste (approx. 2 parts thickener to 1 part epoxy).
The Wet Dry 700 epoxy is the favorite epoxy putty for all sorts of rot and other repairs. It even bonds to wet surfaces.
| Order Low V epoxy or Wet Dry 700 two part EPOXY Products NOW |
STEP 5
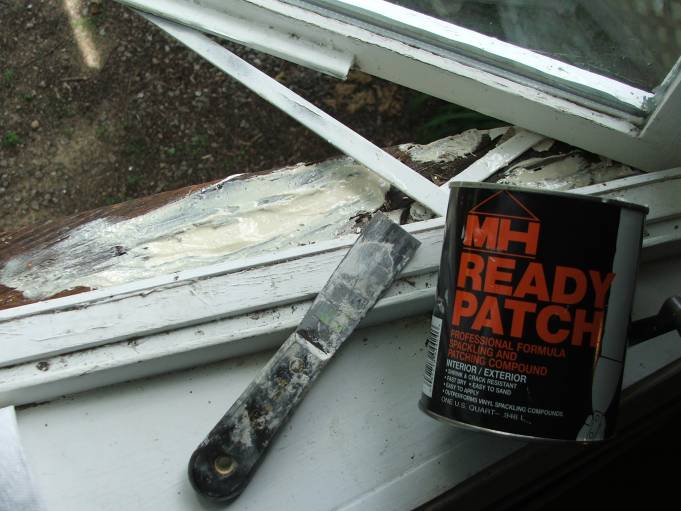
Using an exterior putty (cheaper and easier to sand/smooth - buy from local hardware store) fill the remaining hole. Let harden and sand smooth. It is much easier to sand and shape the non epoxy putty.
We really appreciate you visiting PROGRESSIVE EPOXY POLYMERS, INC. and our web site: EPOXYPRODUCTS.COM. Take advantage of the CONTACT links on this page to ask questions about our products and/or your projects. You can stay in touch with us via our NEWSLETTER (link on our contact page) which is emailed every 6-8 weeks.
This current page is all about:
Repairing Wood Rot - DIY Window
Epoxy Repair
Wood Rot Repair with epoxy products
"The Wet Dry 700 epoxy paste worked great for patching for the rotted dingy transom. I cut out the rot, fitted new oak pieces, and patched with the Wet Dry 700 epoxy. Easy as pie." -- John 1/15 WET DRY 700 INFO
STEP 6
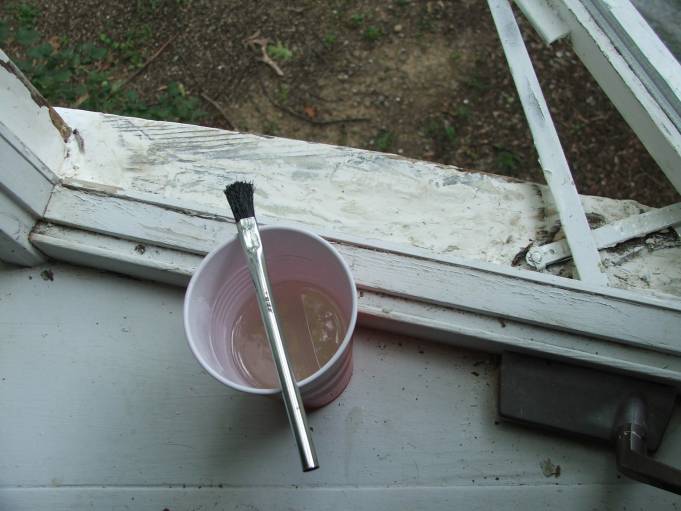
Using the same epoxy you used in step 2, coat the putty patch and the surrounding wood. This will 'seal' in the
putty patch (locking it away from rain, ice and snow) and prime the patch and the window sill (or whatever) for
painting.
You can add pigment to the epoxy, which will make it easier (few coats) to topcoat.
STEP 7
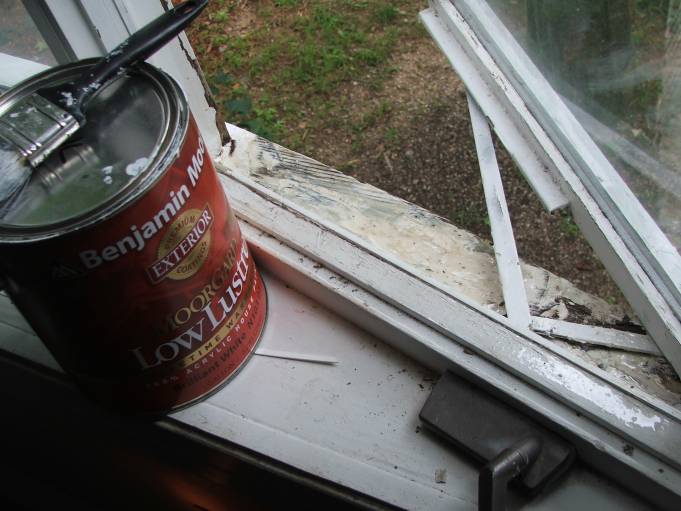
Paint the area with a good quality paint (100% acrylic latex or enamel).
YOU ARE NOW DONE!
----------------
"WOW! Just completed one coat
of ESP 155, then Epoxy Cream to fair, two more coats of 155. I'm delighted with the finish. I just didn't order
enough.
Thanks for great advice." --- M.B. 9/2010 (repair project)
Log Cabin Rot Repair
I get lots of calls (call anytime 603-435-7199) or emails (pauloman555@yahoo.com) about rot issues in log structures - mostly log cabin homes.
Like windows you remove most of the rotted wood and replace with chunks of wood, expanding spray foam, or even epoxy mixed with sand (epoxy cement).
The two epoxies used mostly for this repair is our wet dry 700 Kevlar (tm) re-enforced epoxy putty. It bonds to wet or damp surfaces and and will make structural repairs and replace lost wood.
Next you want to use our solvent free (no shrinkage - no fumes - no VOC) - Low V epoxy (stands for low viscosity). This clear (yellows quickly) will bond to dry, damp or wet surfaces. It will form a water proof 'crust' over slightly damp wood surfaces and you can pour it into cracks etc. It will not drive out the trapped water, but it will harden in place.
You can also pre-coat areas with the Low V epoxy - putty fill the spot - and then seal and water proof the putty repair with the Low V epoxy.
When done, you will need to paint over the epoxy repairs.
Another wood rot repair web site - CLICK HERE
Another (simple) web site dealing with rot - CLICK HERE
|
DEALING WITH WOOD ROT |
|
|
|
--
CUSTOMER FEEDBACK:
"Hello: I would be glad to help
someone else work through this
seemingly daunting task.
I think what really helped me was to realize that this entailed a lot of very doable individual tasks , all within the skill level of most handymen or women. One other note: patience is required. Step 1/ remove all rotted wood. In our case , this was about 1/2 the diameter of our 12" logs. I found the best tool to remove the rotted wood was a 12"or 14" electric light duty chain saw. Step 2/ Then I sprayed anti-freeze on the remaining wood to stop the rot. I let the logs dry for several days and then repeated the anti-freeze spraying. Again, I let it completely dry for several days. Step 3/ I soaked the remaining logs with Low V 2-part epoxy ,let it dry for a couple of days and repeated the process. I used a paint brush to apply the Low-V , and generously applied it. Use a throw-away paint brush each time , because it will be unusable after use. - A top problem solving coating - best seller Step 4 / I then cut dimensional lumber to replace the rotted wood . I used 2" x ? ,because they were cheap and convenient to work. I would cut each one to fit individually . So the first one was a 2" x 12" , set vertically. Then the next board was a 2" x 8" , then a 2" x 6" , and ultimately a 2" x 4". Then I sandwiched them all together , and deeply counter-sunk the screws so I wouldn't interfere with my rounding off the exterior of the wood. This may sound confusing , so let me describe what the end result looked like. Envision a 12" log 3' long. Half of this log was rotted and removed. So my sandwich to replace the rotted wood was a 2" x 12" , 3' long , a 2" x 8" 3' long , a 2" x 6" 3' long and a 2" x 4" 3' long. These would all be set vertically and attached together with a couple of long screws [ or you could glue them, I would think]. Before you attach them together you can remove the excess material with a circular saw , a band saw or your chain saw. The end result is a sandwich of lumber about 6" wide and 3' long , with the outside diameter being a 12" radius to match the 1/2 log remaining. Then I screwed this sandwich to the remaining log [ I used screws made by Fasten-Master Timber Lok. These are not cheap but are very high quality]. Step5/ I mixed a batch of Wet/Dry 700 Epoxy , (A top problem solving coating - best seller) and slathered it over the sandwich and between the sandwich and the remaining original log. If it suits you to thicken this material , you can use sawdust or sand . I found the sawdust thickener to be more user friendly to the last step of removing any wood that doesn't look like a log. The sand is really hard on whatever tool you use to dress up your log. I found the best tool to use for the sculpting of you log is a grinding wheel used on an angle grinder.[ It is called "Gallahad" ]. A caution: This is a really aggressive tool and you need to hang on. But you could use any tool you feel comfortable with : Body grinder , chain saw , disc sander or even files. I wish you well. One last word : Paul Oman (owner of Progressive Epoxy - 603 435 7199) is a very knowledgeable man , and freely shares his knowledge. His products are high quality and as represented. And he answers his phone. Ralph" Purchase Wet/Dry 700 epoxy paste and Low V low viscosity epoxy at EpoxyUSA.com |
|
WET DRY 700 (tm) - kevlar (tm) / feldspar/ceramic industrial grade epoxy paste. Cures underwater or on dry surfaces. If you only kept one epoxy putty repair product on your boat, workshop, or tool box, this would be it. This off-white epoxy (turns yellow over time) can be applied underwater. It has saved sinking boats, leaking swimming pools, repaired rotting window sills, and bonded wood to wood, wood to cement walls etc. Wall mud or cake icing thick. Not be be confused with our thick light blue or white Water Gard 300 epoxy paint which can also be applied underwater (generally pool repairs or marine barrier coats) or our thick, gray, kevlar (tm) reinforced epoxy underwater paint, Corro Coat fc2100A. CLICK HERE FOR MORE INFO on all three of these industrial epoxies.
Jeff (1/2013) I cannot believe how incredible this Wet Dry 700 is. It's revolutionary. The original repair to my storm shelter would have lasted years if the shelter would just stop shifting around in the ground. DON'T STOP SELLING THIS STUFF. (10/2013) Comments: Returning - Underwater boat repair - My third or fourth order and am still quite pleased with the result. It has many uses above and below the water line.
|
Chemotherapy for Rot
Once rot gets a toehold in wood it is difficult to cure completely -- it is like a cancer. Digging out the rotted
wood will still leave spores and water in the sound wood. After you fill in the cavity with something like epoxy,
the rot continues to flourish underneath. Products promoted to make rotted wood sound and stop rot penetrate only
until they meet water, with which they do not mix. Under the solid repair rotting goes on. With one exception (more
later), the commercial products sold to treat dry wood to prevent rot are completely ineffective against established
rot in wet wood because they are dissolved in petroleum solvents and oil and water do not mix.
There are two commonly available inexpensive materials that will kill rot in wood and prevent its recurrence. First,
there are borates (borax-boric acid mixtures) which have an established record in preventing rot in new wood and
in killing rot organisms and wood-destroying insects in infested wood. Second, there is ethylene glycol, most readily
available as auto antifreeze-coolant. Glycol is toxic to the whole spectrum of organisms from staphylococcus bacteria
to mammals. All of the published material on its effectiveness against wood-destroying fungi and insects that I
am aware of is the result of my investigations over the past 15 years.
Both borate solutions and glycol penetrate dry and wet wood well because they are water-soluble; in fact, penetration
by glycol is especially helped by its extreme hygroscopicity -- its strong attraction for water. For both, the
fact that they are water-soluble means they are not permanent solutions to rot in wood that is continually exposed
to water-below the waterline and in ground-where they will eventually be extracted-dissolved out.
I first was interested in glycol as a wood-stabilizing agent, where it is in many ways superior to polyethylene
glycol (PEG), and it was during this work that I realized the useful effect of glycol on organisms, though I was
pretty dense in interpreting the first experiment.
The ladies immerse the stems of greenery such as magnolia branches in glycerin to keep them green. Glycol is very
similar to glycerin in all its physical properties and much cheaper, so I stuck a magnolia branch in antifreeze.
The next day it was brown. After the third attempt I tumbled to the fact that the glycol was killing the greenery.
This was the reason that glycol never replaced glycerin in applications such as a humectant for tobacco and an
ingredient of cosmetics and pharmaceutical ointments, though it had all the desirable physical properties.
I had two 2" thick slabs of a 14" diameter hickory tree that had just been cut. I treated one with antifreeze
and left one untreated. I was looking at wood stabilization, not rot prevention. After about six months stored
inside my shop the untreated control was not only cracked apart, but it was sporting a great fungal growth, while
the treated slab was clean.
The local history museum wanted to exhibit two "turpentine trees", longleaf pines that had many years
ago been gashed to harvest the sap that made everything from turpentine to pine tar. The trees delivered to us
after cutting were infested with various beetles and had some fungal growth. I treated them with antifreeze outside
under a plastic tarpaulin every few days for three weeks. They were then free of insects and fungus and have remained
so after being moved inside and installed in an exhibit over four years ago.
I took three pieces from a rotting dock float that were covered with a heavy growth of fungus, lichens, etc. I
treated one with antifreeze painted on with a brush, the second with a water solution containing 23% borates (as
B2O3), and left the third untreated as a control. They were left exposed outdoors and were rained on the first
night. By the next morning the growth on the antifreeze-treated piece was definitely browning and the borate-treated
piece showed slight browning. After two months exposure to the weather the growth was dead on the antifreeze- and
borate-treated pieces and flourishing on the control.
I have a simple flat-bottomed skiff built of plywood and white pine, which has little
resistance to rot. After ten years some rot developed in one of the frames. It may have begun in the exposed end
grain. It consumed the side frame, part of the bottom frame, and part of a seat brace fastened to the side frame.
The plywood gusset joining the side frame to the bottom frame was not attacked. I excised the rotted wood, saturated
all with ethylene glycol antifreeze to kill all the rot organisms, and there has been no further deterioration
in four more years afloat with wet bilges. I have not replaced any pieces, as I am building another boat that can
replace it; that is more fun, anyway.
I have a 60+-year old case of the fungus infection known as "athlete's foot". Many years ago it infected
the toenails extensively. The whole thing was pretty grotesque. My dermatologist and druggist both assured me there
is no known cure. About six years ago I started using antifreeze applied under the nails with a medicine dropper
about every five days. The professionals are technically right. I have not completely cured it, but the nails have
grown out pink and thinned almost to the ends and I never have any trouble with blistering, peeling, or itching
between the toes as I had had for six decades. No drug company is going to have any interest in this because the
information has been in the public domain for so long that there is no opportunity for any proprietary advantage.
The various wood-rotting organisms cannot be anywhere near as tough.
There are two types of borate products commercially available for treating wood-solid sodium octaborate for making
solutions in water (Tim-Bor® and Ship-Bor®) and a 40% solution of sodium octaborate in ethylene glycol
(Boracare®). Their equivalents and more concentrated solutions can be easily prepared from borax, boric acid,
and antifreeze at much lower cost. Keith Lawrence, editor of Boatbuilder offered to sell me advertising if I wanted
to go in the business, but I might run afoul of patents (preparation for individual use is not prohibited), I would
have to get EPA registration, and I could not deliver products anywhere near as cheaply as they can be made from
raw materials available at your supermarket, drugstore, and discount store.
Glycol by itself has one big advantage over solutions of borates in either water or glycol. Glycol penetrates rapidly
through all paint, varnish, and oil finishes (except epoxy and polyurethanes) without lifting or damaging those
finishes in any way. You can treat all of the wood of your boat without removing any finish. The dyes in glycol
antifreeze are so weak that they do not discolor even white woods. Once bare wood has been treated with glycol
or the borate solutions and become dry to the touch it can be finished or glued. IN THE YEARS SINCE I FIRST WROTE
THIS ARTICLE, MY EXPERIENCE HAS BEEN THAT GLYCOL BY ITSELF IS GENERALLY THE BEST TREATMENT FOR KILLING ROT. Gougeon's
research has shown that borate solutions weaken epoxy joints in the treated wood. If a borate solution leaves white
residues on the surface, it will have to be washed off with water and the surface allowed to dry.
If you decide you need to treat with both glycol and borates, this is my preferred process to treat rot. Once you
find soft wood or other evidence of rot, soak it with antifreeze even if you cannot do anything else at the moment.
Paint it on or spray it on with a coarse spray. Avoid fine mistlike spraying because it increases the likelihood
that you will breathe in unhealthy amounts of glycol. Put it on surfaces well away from the really damaged wood,
too. Use glycol lavishly on the suspect wood, which will readily absorb 10-20% of its weight of antifreeze.
Next dig out wood that is rotted enough to be weak. Add more glycol to wet the exposed wood thoroughly. Then add
the 25% borate solution of the recipe below so long as it will soak in in no more than 2-3 hours. Then fill in
the void with epoxy putty and/or a piece of sound treated wood as required. The reasons I use borates at all are:
1) it is a belt-and-suspenders approach to a virulent attack, and 2) over a long period glycol will evaporate from
the wood; especially, in areas exposed directly to the sun and the high temperatures that result.
If there is any question about water extracting the glycol or the borates, you can
retreat periodically with glycol on any surface, painted or bare, and with borate solutions on bare wood.
Glycol's toxicity to humans is low enough that it has to be deliberately ingested (about a half cup for a 150 lb.
human); many millions of gallons are used annually with few precautions and without incident. It should not be
left where children or pets can get at it, as smaller doses would harm them, and they may be attracted by its reported
sweet taste that I have confirmed by accident. The lethal dose of borates is smaller than of glycol, but the bitter
taste makes accidental consumption less likely.
BORATE WOOD PRESERVATIVES:
COMMERCIAL AND HOME-BREWED
Tim-Bor®: Solid sodium octaborate; dissolves in water to make approx. a 10% solution containing 6.6% borate
(B2O3); about $3/lb. plus shipping.
Ship-Bor®: Same as Tim-Bor®; $19.95/lb. plus $2 shipping.
Bora-Care®: 40% solution of sodium octaborate in ethylene glycol; 27% borate content; $70/gal. plus shipping.
Home-Brew Water Solution of Borates:
All percentages for this recipe and the others here are percentages by weight. Based on U.S. Navy spec. of 60%
borax-40% boric acid (this ratio gives the maximum solubility of borates in water); 65% water, 20 %borax, 15% boric
acid; 15.8% borates; borax costs 54 cents/lb. (supermarket), boric acid costs about $4/lb. in drug stores (sometimes
boric acid roach poison, 99% boric acid, is cheaper in discount stores); equiv. to Tim-Bor® or Ship-Bor®
at 30 cents/lb. To make this solution mix the required quantities and heat until dissolved. The boric acid, in
particular, dissolves slowly. This solution is stable (no crystals) overnight in a refrigerator (40°F.), so
can be used at temperatures at least as low as 40°F.
Home-Brew Glycol Solution of Borates:
This is equivalent to Bora-Care® diluted with an equal volume of glycol to make
it fluid enough to use handily; 50% glycol antifreeze, 28% borax, 22% boric acid. To make a stable solution you
mix the ingredients and heat till boiling gently. Boil off water until a candy thermometer shows 260°F. This
removes most of the water of crystallization in the borax. This solution is stable at 40°F and has a borate
content of 26%. With antifreeze at $6/gal. and borax and boric acid prices as above, this is equivalent to Bora-Care®
at about $15/gal.
|
SEVEN EPOXIES/COATINGS THAT WILL SOLVE ALMOST ANY PROBLEM
|
|
(FOR A COMPLETE LIST OF PROBLEM SOLVING COATINGS VISIT OUR HOME PAGE) |
|
|
|
"The Epoxy Guru" FOR CASE STUDY EXAMPLES AND A PLACE TO ASK QUESTIONS - VISIT THE EPOXY GURU |
Products offered by Progressive Epoxy Polymers, Inc.
LOW V™ (thin, solvent free
epoxy - add solvent to this to make a penetrating or priming epoxy. Add thickeners to form a paste) - Click Here
(low V epoxy) - A top
problem solving coating - best seller
ESP 155™ (our own clear primer epoxy with approx. 25% solvent - add more solvent for an easy penetrating epoxy) - Click Here (epoxy sealer) - A top problem solving coating - best seller
WET DRY 700™ (epoxy paste - bonds to wet surfaces) - Click Here (underwater epoxy) - A top problem solving coating - best seller
EPOXY CREAM™ (epoxy paste - bonds to wet surfaces) - Click Here (easy to use epoxy filler putty)
EZ THICK - (thickening powder for epoxies) - Click Here (epoxy thickeners)
EPOXY PIGMENTS - Click Here
ANOTHER ROT REPAIR WEB SITE: CLICK HERE
*
OTHER RELATED LINKS ON ROT, EPOXY PRIMERS, ETC.
Penetrating epoxies
-
www.epoxyproducts.com/penetrating4u.html
Treating rot (this page!) - www.epoxyproducts.com/rot.html
Competitor's penetrating epoxy solvent list - www.epoxyproducts.com/solvents.html
More on epoxy primers - www.epoxyproducts.com/primer.html
Sealing wood (tests) - www.epoxyproducts.com/woodseal.html
Links to 3rd party YouTube Rot Repair Videos and more
ON-LINE CATALOG HOMEPAGE.
Inside Our non-marine, commercial, DIY Catalog:
corro coat FC 2100; water gard 300; CM 15; crack coat™; liqua tile 1172 potable water; water prime
Find Corro Coat FC 2100 and Water Gard 300 epoxy in our Best Selling - fix anything Catalog
water bond (water based); industrial floor epoxy; bio vee seal; walnut shell; rough coat grit filled epoxy floor paint; epoxy clear top resi
wet/dry 700; splash zone A-788, epoxy cream; splash zone a-788
Find Wet Dry 700 epoxy in our Best Selling - fix anything Catalog
low V epoxy; basic no blush; ESP 155; Bio-Clear 810; epoxy clear top resin
Find Low V, Basic No Blush, and ES 155 epoxy in our Best Selling - fix anything Catalog
Aluthane moisture cured urethane; Acrylic Poly UV Plus and other 2 part polys ; Capt. Tolley's creeping crack sealer; india spar varnish;
Find Aluthane in our Best Selling - fix anything Catalog
fumed silica; fiber fill; micro balloons/micro-spheres; graphite; wood flour; EZ thick, rock flour;
water activated pipe wrap; TA 661 solvent-free epoxy brush cleaner; fiberglass tape/cloth
short nap epoxy rollers; epoxy/stone deck resurfacing roller; 1 inch foam brushes; 2 inch bristle brushes; tongue depressors
Questions? / Phone order? / EMAIL / CALL 603-435-7199 EST / BUY ONLINE
GOOGLE SITE SEARCH - Click here Epoxy specific site search
Click here - YouTube video. Learn about Progressive Epoxy Polymers Inc.
EVAL4U - how to evaluate your epoxy vendor - CLICK HERE -
Epoxy Only Web Google Search
#1) Google
Everything Epoxy Searches
#2) Google
Marine Epoxies Searches
#3)Google
Floor Epoxy Searches View
our Progressive Epoxy Products, Inc.
Add yourself to our email newsletter list. We send out a short newsletter about 4 - 8 times a year. It keeps us in touch with you and allows you to find us again when you have a new project pending. Send us a quick email asking to be put on the newsletter list -
 |
 |
 |
||
|
site master |
protagonist |
ground zero |