| |
A few points up-front:
1) if the water is actively flowing our of the cracks/walls, it will push aside the wet epoxy and open up an unobstructed
path into your basement.
2) if sealing a crack or joint (commonly where the wall meets the floor), sealing one area may just move the water
flow to the next path of least resistance - i.e. several inches or feet farther along the wall - perhaps to an
area that was leak free before. You'll also need to coat perhaps six inches or so beyond the edges of the 'crack'
or seam (up and outward). THE SURFACES MUST BE
VERY VERY CLEAN - YOU NEED TO GET MAX EPOXY BOND. USE OUR ESP 155
EPOXY CEMENT SEALER AND PRMER TO PROVIDE MAX BOND OF THE
EPOXY/FIBERGLASS TO THE CEMENT (corro-coat
fc2100A fiber-reinforce epoxy paint)
4) If your floor has been coated or sealed before you might have problems with a new sealing job. Some concrete
floors are sealed with a 'waterglass' or wax/silicon based sealer. Not much sticks to these kind of surface especially
when seeking an extremely tight and waterproof bond. Our Bio Vee Seal will also not work, as it will not soak into
the concrete. Nothing sticks to 'silicon seal' either. Putting epoxy over an existing paint or epoxy means the
bond will be only as good as it was on the old coating, now covered with the new epoxy.
5) If your basement is damp and musty, but has no obvious cracks or seams to seal, then the easiest and cheapest
sealer is our non-epoxy Bio Vee Seal. (this product has its own web site - click
here). This product soaks into the concrete and forms crystals inside the pore spaces of the concrete, thus
reducing porosity and permeability. It leaves nothing on the surface of the concrete.
6) If you have water seeping
through a CINDER BLOCK concrete wall, that is another issue.
Most basement walls are pour concrete but some are stacked concrete
blocks. These stacked block walls are cement and fly ash and tend to
have large spaces ("vugs") or openings on the surface. The size of
these holes varies from manufacturer to manufacturer. In any event,
these 'openings' make concrete blocks difficult to waterproof and
seal. Thin products drain out and paints of all kinds never seem to
completely fill and seal the holes. The best product to seal
cinder block walls is our EPOXY CREAM product. It is a toothpaste
like thickened epoxy gel that easily slides off a putty knife like a
hot knife through butter. This makes it easy to fill cinder block
vugs and give the block a smooth surface. Find EPOXY CREAM in our
industrial catalog -
CLICK HERE
|
IN A
NUT SHELL --- Wall - Floor Seam Leak Repair
The fix is
almost like doing a fiberglass cloth and epoxy
seam/repair on a boat or a drywall seam in your house.
When the surface is dry,
clean really well to get off all dirt, clay, etc.
Start with an epoxy primer/sealer on the exposed concrete
(ESP
155). Paint
on a layer of
FC
2100 /kevlar epoxy along the seam and up the wall a few
inches and out onto the floor a few inches. Press into
it a layer of fiberglass cloth, extending up the wall
and out onto the floor. Add more epoxy over the
fiberglass cloth to saturate it with epoxy resin.
Generally add a second optional layer of fiberglass
cloth over the saturated first layer and saturate it too
(two or more layers of cloth are better than one). Hours
or days later come back and brush on a fresh lower of
epoxy over the first fiberglass/epoxy layer. This is to
make sure you get any thin spots, missed areas or tiny
pin holes covered with epoxy. Now wait for the next big
rain storm. If you see areas of small leaks over your
repair, repeat with more epoxy or more epoxy and
fiberglass cloth. You cannot just fix the immediate area
around the original leak - the leak will just move down
the wall/floor a few feet. You generally have to do the
entire wall/floor length.
Order our 1.5 gal Kevlar (tm) ceramic gray wet
surface epoxy -
Corro Coat FC 2100A (click
here to buy - under EPOXY PAINTS). The 3
inch or better yet, the 4 inch wide fiberglass cloth (4
inch by 50 yards) is in the
ACCESSORY
section.) Optional "stab brushes" (see below) to push
epoxy into crack/seam etc. Total cost is about $400
|
Things go better with Fiberglass
Cloth
We sell 9 oz fiberglass cloth in 50
yard rolls. Three inch or four inch
wide fiberglass "tape". The "tape"
is easier for beginners to work with
than big sheets of fiberglass -
(saturate with epoxy and apply like
strips of duct tape). Use for
boat-building and/or repair, epoxy
pipe wrap projects, and basement
leak repair (sort of a dry-wall tape
system but using fiberglass cloth
and epoxy. Note that when using
epoxy and fiberglass cloth, the
strength comes from the fiberglass
cloth and not the epoxy. - Order the
3 inch or 4 inch fiberglass rolls at
either of our on-line stores or call
to order your epoxy and cloth - 603
- 435 -7199.
|
EPOXY CREAM
in our industrial catalog -
CLICK HERE - for
leaking Cinder Block wall sealing
Top 7 List Of
Reasons for Using Our Leak Sealing Epoxies:
1) Special epoxy that will bond to
damp surfaces (fc 2100A)
2) Epoxy contains Kevlar (tm)
fibers for gap filling (fc 2100A)
3) 24/7 phone and email support
4) Honest and complete info (pro and con) on this
site. You get the FULL story.
5) Sold by an epoxy coating company and not a
sales/marketing firm
6) Made in the USA
7) We appreciate your interest and thank you
sincerely for your business!
|
Why
Corro
Coat
FC
2100A
epoxy
is
the
BEST
in
its
class:
1.
Gap
filling
Kevar
(tm)
based
epoxy
paint
2)
can
be
applied
underwater
3)
special
high
end
curing
agents
allow
shipping
by
air
4)
no
nonyl
phenol
5)
cycloaliphatic
formulation
6)
no
odor
or
solvents
7)
strong
user
support
/
feedback
8)
24/7
support
NO SALES TAX - You
are shopping in TAX FREE
New Hampshire
-
New
England's
"Granite
State"
|
|
OK - here we go:
There are lots of wet basement foundation problems and they are all different. The most common are water escaping through
the walls or floors, coming out of obvious cracks and coming out of floor wall seam.. The floors are always poured
concrete, but the walls could be block or poured concrete. For the moment, we'll consider the poured walls.
WATER PASSING THROUGH THE WALL/FLOOR CONCRETE
FOUNDATION CRACK
Contrary to what many people think, cement is rather porous and permeable. It can fill with water, and worse yet,
water can pass through it, migrating into your basement. The result and be dark, damp concrete, a musty smell,
or even liquid water after a good rainstorm or winter melt.
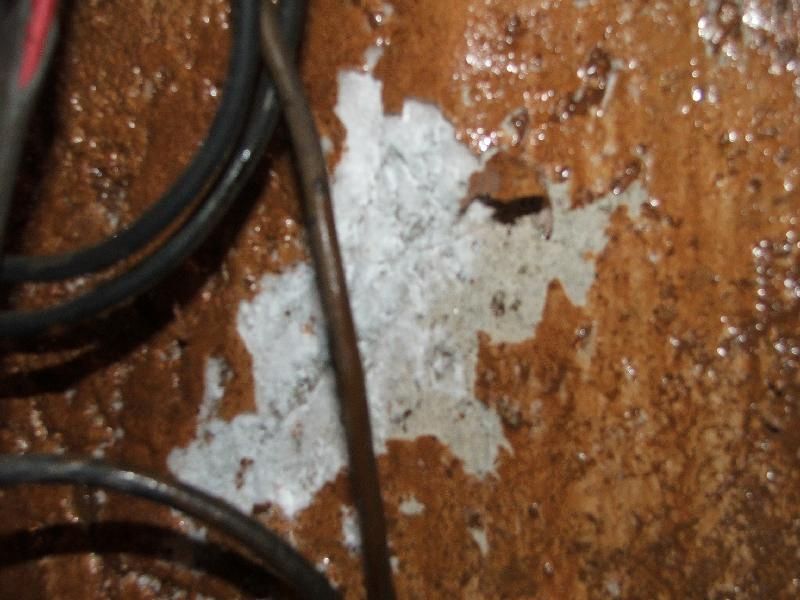
While not always present, but when it is, not a good sign, is what looks like white dust or powder on the walls
or floor. These are mineral crystals that were in the water the migrated through the concrete and were left behind
when the water evaporated inside your basement. The minerals could come for the surrounding groundwater or perhaps
even out of the cement itself. It is possible that your concrete walls are literally dissolving away. If so, the
leaking will only get worse year after year.
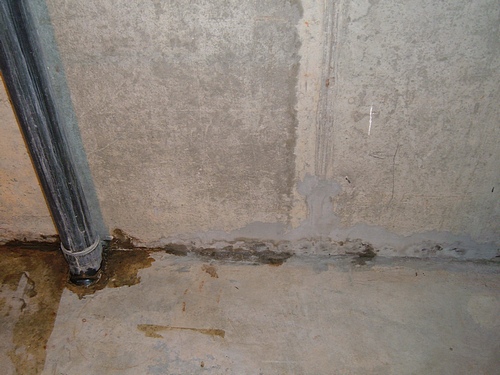
TWO EXAMPLES OF MINERAL SALTS/CRYSTALS ON WALLS FROM WATER PASSING THROUGH THE WALLS - NOTE
CONCRETE CRACK REPAIR ON LEFT PICTURE
The bad news is that as these crystals grow and form, they can generate up to 2000 pounds of pressure, popping
off just about any coating or sealer applied over them (more so because these coatings are probably applied to
a crumbling, weak or dirty surface to begin with).
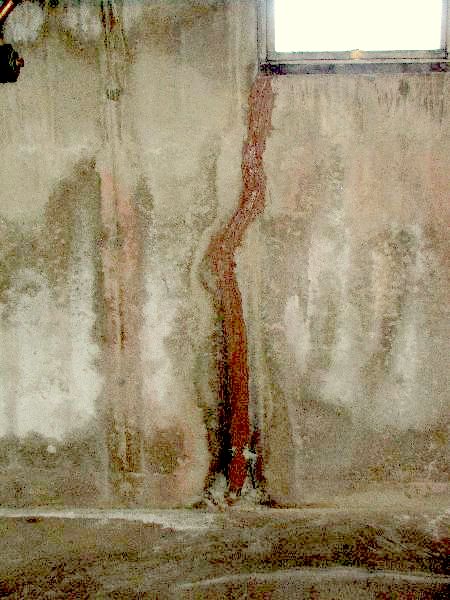
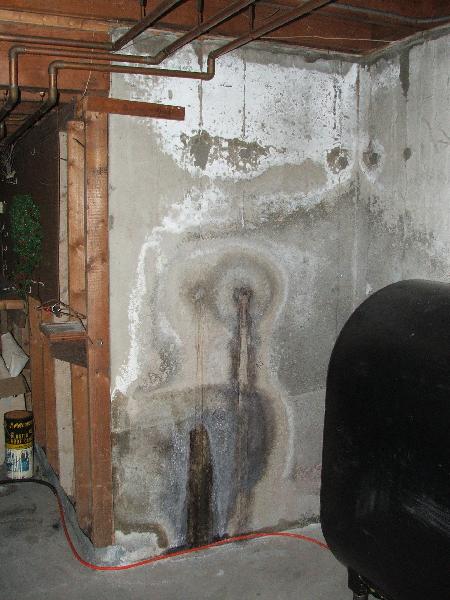
NEW MINERAL GROWTH THAT 'POPPED' OFF THE CLEAR EPOXY SEALER
After cleaning the surface, the best attempt to fix this problem is our
Bio Vee Seal. This product is designed
to soak into the concrete and form its own crystals below the surface, thus ‘clogging' up the concrete and reducing
the ability of the water to move through the concrete. This is an easy and cheap, first attempt to fix the problem.
In addition to, or instead of, the next option is to apply two coats (always better than one coat!) of a watery,
thin epoxy. Generally this epoxy is thinned with solvent to help it ‘penetrate' into the concrete a little bit,
giving it a better, stronger bond. This would be our ESP 155 solvent thinned epoxy or our solvent free Low V epoxy
which you have (or have not) added some solvent. We suggest two coats because it is most likely that with just
one coat there will be tiny ‘pinholes' where the coating is missing. We've seen the water literally ‘jet' out of
these invisible coating pinholes. With two coatings hopefully these thin or missed spots are covered in the second
coating.
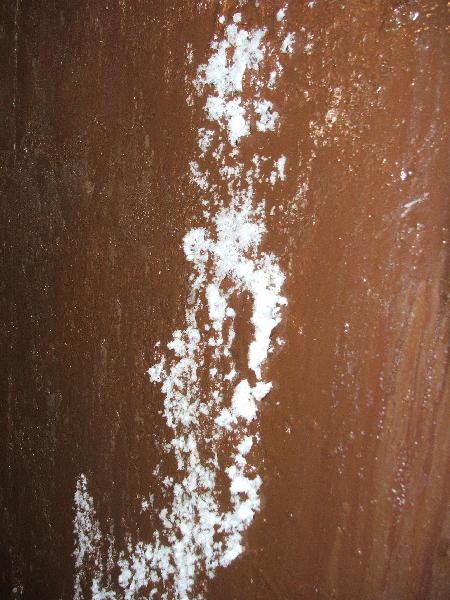
FRESH MINERAL SALTS/CRYSTALS THAT DEVELOPED THROUGH
PINHOLES AND THIN SPOTS IN THE EPOXY COATING ON CONCRETE WALL
The next step (some folks just use the sealer above
or this thick epoxy as a one coat fix) is a thicker epoxy paint. This step gives a thicker overall coating
to the wall or floor, and these epoxies are often pigmented (compared to the clear coatings above).
Usually the thick, Kevlar (tm) reinforced epoxy paint - Corro Coat
fc2100A is best. The fibers bridge gaps and this epoxy sticks to wet
or damp surfaces. This is the same epoxy recommended for leaking
floor - wall joints (see below).
WALL/FLOOR CONCRETE CRACK REPAIR
Here again you have options. The most simple and direct is to simply apply a thick goopy epoxy gel/paste (or even
a less thick epoxy paint) into and along the crack. Our kevlar (tm)
re-enforced thick Corro Coat FC 2100 A (even bonds to wet surfaces) is
a favorite here.
Even just one tiny pinhole left behind and the water will squirt out like a jet. The
best plan is therefore 2 or 3 coats of the epoxy. It is also an option to use a thin or solvent thinned epoxy
(Our ESP 155) as
the first coat (as a primer or sealer) as this thinner first coat will probably "soak" in a bit and provide
a stronger bond to the thicker top coat epoxy (as well as help prevent those nasty pinholes in the thicker coating).

CONCRETE CRACK REPAIR WITH THICK EPOXY
On larger cracks I have been successful using fiberglass cloth and epoxy resin (like building a boat) to ‘tape'
over the crack. This is sort of like using a ‘band-aid' and first aid cream, instead of just the first aid cream
on the crack.
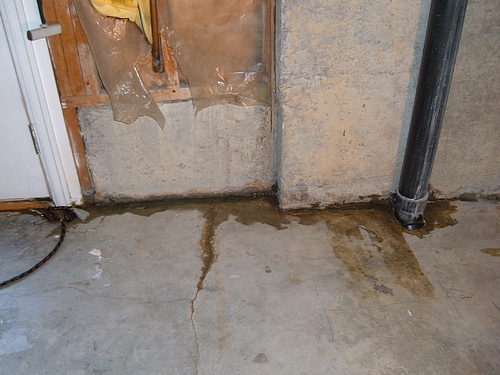
FLOOR/WALL SEAMS LEAK REPAIR
Leaks along the floor and wall seam are very common. The bad news is that if you just fix the area around the current
leak, the leak will probably just move farther along to the next ‘weak link'. You may have to seal the entire length
of the wall, or perhaps all the way around the entire room.
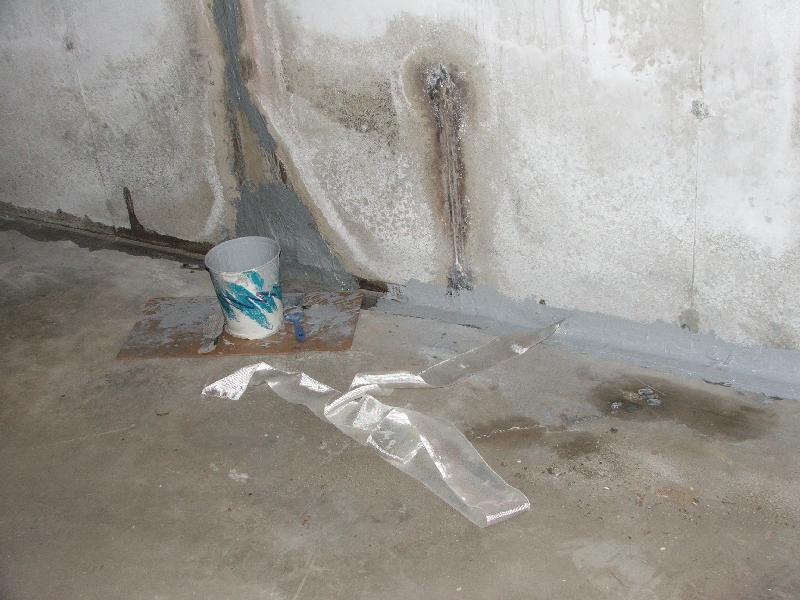
The first step is to get it area as dry and clean as you can. Lots of dirt/mud gets drawn in with the water and
you cannot seal or coat the dirt and expect it to be effective. The best fix approach here is to first ‘paint'
the seam (about 4-6 inches out onto the floor and about 4-6 inches up the wall) with an
epoxy paint (like those mentioned above).
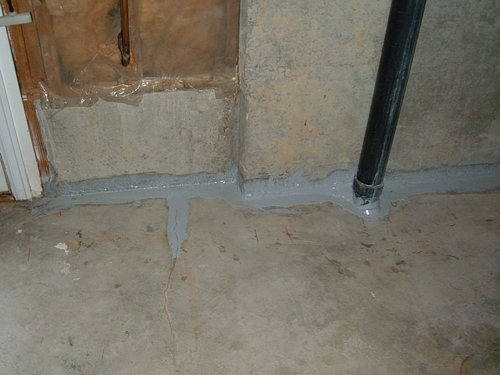
A coat or two usually stops the leak. After this first coat of epoxy has cured, the next move is to apply more epoxy with
two layers of fiberglass
cloth along the seam and on top of the first layer of epoxy (sort of like ‘taping'
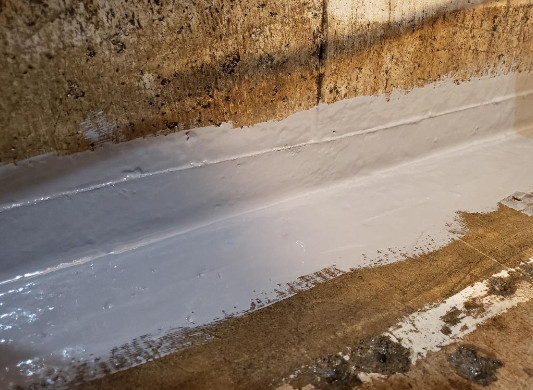
a drywall seam). There will be pinholes and ‘leaks' in the
cloth/epoxy layer (especially in rough surface areas, corners, and
at the ends/beginnings of the strips of fiberglass cloth). So, once
the epoxy/cloth layer has cured, one more coating of the same epoxy
is brushed over the epoxy/cloth layer. This usually does the trick,
albeit, a 3 coat system.

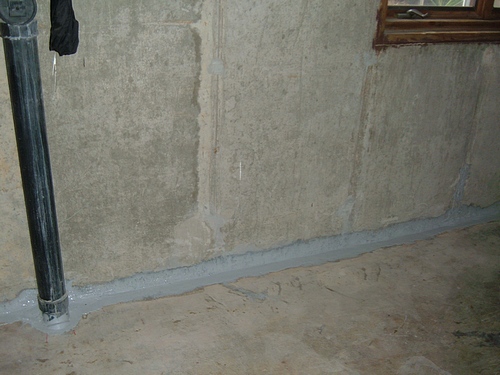
FIXING THE CONCRETE FLOOR WALL SEAM WITH GRAY
Corro Coat FC2100A EPOXY WITH FIBERGLASS CLOTH
Generally folks order the 1.5 gal kit of the Corro Coat fc 2100 A - a roll of the 4 inch wide fiberglass cloth - 1 1/2 gal unit of ESP 155 epoxy sealer and primer (not for sale in Calif.)
user feedback:
"You prepared me well. I would just say to have many
rags, garbage bags and several sets of disposable gloves. Wear old
clothes. Those items made it much easier. If you're in a crawl
space, it's probably a good idea to wear a mask and cap.
I made the mix in a plastic pitcher and poured it
from there. For some areas,I dipped the brush in the mixture and
spread it on. After I was finished, I wrapped everything up in a
garbage bag and threw it all out, took a shower andwas good to go."
- Donny
2100A epoxy and fiberglass basement
leak repair
|
Epoxy "Stab Brush" -- "Regular Brush" |
|
Use with
products on this page |
|
buy separately or
include with your order |
|
 |
|
STAB BRUSH
- 3 inch wide with 3/4 inch bristles. Most epoxies are too thick for
a regular brush. Stab brushes allow you to push and move the epoxy
around and 'stab' or poke it into cracks, voids, and corners |
| REGULAR BRUSH - 2
inch wide and extra thick with synthetic bristles. Use with varnish,
paints and thin epoxies. Priced for disposable use. |
|
|
|
Goto our 3rd party storefront
and purchase in the
MISC
SECTION |
Stab
Brushes are a good way to apply
thick epoxy to cracks and
fiberglass cloth
(Cinder) BLOCK WALLS
The density and particle size in the blocks that make up these walls varies a lot. Generally the Bio Vee Seal will
not work as the gaps and voids it tries to fill are too big. The best attempt at a fix here is simply several coats
of epoxy paint or resin. It will take more than one plus coats to seal it completely as there is no way you will
able to fill all the ‘indents'/voids/spaces that make up the surface with just one roller or brush applied coat.
|