PROGRESSIVE EPOXY POLYMERS, INC.
Coatings for every project, issue & repair
Stitch and Glue Boat Building - Beginner's Guide
Winter curing option - build down to under 32 F degrees
NO SALES TAX - You are shopping in TAX FREE New Hampshire
** Quick EMAIL / ph 603.435.7199 EST / Google SITE SEARCH / Buy On-line TWO STORES / Goto Contact PAGE / Web Product CATALOG / Progressive Epoxy HOMEPAGE / View our VIDEO / Navigation Bar REPLACEMENT / Data and MSDS PRODUCT INFO / Epoxy Guru HELP SITE / Top Selling Products - FAVORITES * *
Your Host and Tour Guide:
Paul Oman, MS, MBA - Progressive Epoxy Polymers, Inc. (floor epoxies, marine epoxies, underwater epoxies, repair epoxies)
Member: NACE (National Assoc. of Corrosion Engineers), SSPC (Soc. of Protective Coatings)
Board member: Friends of the Suncook River - 501(c)(3) non profit ----- Founder: Friday Night Paddlers .
We are the only technology based coating/epoxy/resin company that actively encourages your phone calls, not just during our East Coast work hours but also after/before hours, evening, weekends and even holidays. We're available when you are. We form a personal relationship with our customers and freely share technical information, how to-advice, product information and tips-and-tricks. Speak with a non-salesman technical professional with over 25 years of experience in the resin/coating industry.
So you want to build a boat ....
and you've decided to use the stitch and glue method. That's great! This site is an introduction to that boat construction method. While the boat plans you buy will focus on the 'trees in the forest', we'll take a more broad approach to stitch and glue construction - we'll look at the "forest" and not get bogged down in the 'trees". And we'll talk about the epoxy options and the fiberglass you'll need. And then we'll look at the choices for finishing your new boat.
WHAT THIS SITE COVERS:
What is Stitch and glue boat construction?
How do you do stitch and glue?
Problems with Stitch and Glue boat construction
Stitch and Glue construction options
Stitch and Glue tips and tricks
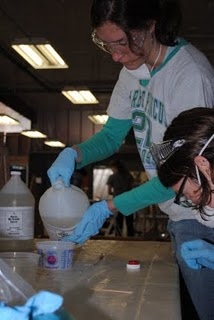
1) cut out your pieces of (cloth) wood - generally plywood but also 'solid' wood pieces using a pattern (or more likely directions and dimensions for each piece. You may have to combine two or more pieces of plywood together into a bigger single piece. There are several methods for doing this with advantages and disadvantages to each method.
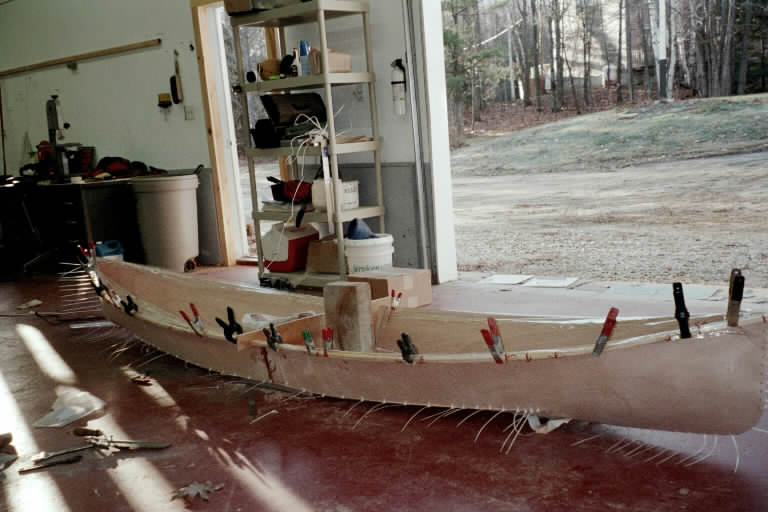
2) stitch (sew) them together. Traditionally copper wire was used, but today plastic cable ties are often used instead.
putting together the pieces
3) generally the next step is to 'glue' the stitched pieces together using thick epoxy (a steady bead or 'spot welds'), or some other kind of glue or adhesive. This is done so that the 'stitches' (wire or cable ties) can be removed (usually pliers and brute force).

cable ties removed - ready for fiber-glassing
4) generally a curved 'filet' of thickened epoxy is applied to smooth out the sharp angle between the side panels and the bottom panels of the hull resulting in a smooth gentle curve that can then be smoothly reinforced with epoxy saturated fiberglass cloth. Personally I like to epoxy/fiberglass the seam first and then 'hide/smooth/even out the fiberglassed seam with a 'cosmetic' filet (which might not even be epoxy, but rather some more easily sandable product).
5) the glued seams are sealed and reinforced with epoxy saturated fiberglass cloth. Usually this is done on both sides of the seams (but I don't think this is necessary on small boats). Any other pieces of the boat are attached (and often secured with epoxy and fiberglass cloth).
|
Things go better with Fiberglass Cloth We sell 9 oz fiberglass cloth in 50 yard rolls. Three inch or four inch wide fiberglass "tape". The "tape" is easier for beginners to work with than big sheets of fiberglass - (saturate with epoxy and apply like strips of duct tape). Use for boat-building and/or repair, epoxy pipe wrap projects, and basement leak repair (sort of a dry-wall tape system but using fiberglass cloth and epoxy. Note that when using epoxy and fiberglass cloth, the strength comes from the fiberglass cloth and not the epoxy. - Order the 3 inch or 4 inch fiberglass rolls at either of our on-line stores or call to order your epoxy and cloth - 603 - 435 -7199. |
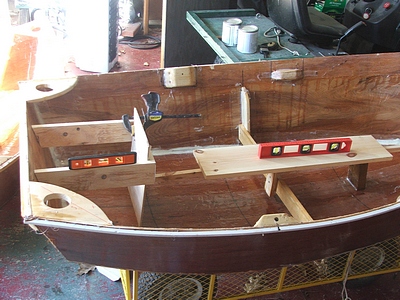
adding non plywood parts
6) next - lots of sanding and filling depending how well you performed the previous steps and how much of a Type A personality you are.
7) finally, paint or varnish as you wish to obtain the 'finished' stitch and glue boat.
Often the plans purchased to build the boat are very specific regarding the steps above, but in reality you have lots of personal choices (cable ties vs. wire, size and timing of the fillets, fiberglass size - number of layers of fiberglass - width of the fiberglass 'tape' (generally 3 or 4 inches wide) - fiberglass or not parts or all of the entire hull, etc.
I find that one of the toughest tasks, at least for me, is cutting out the plywood pieces. You start with a big, bulky 4 foot by 8 foot piece of plywood and it requires very precise and even cutting - especially when you need matching pieces. And the Pros suggest you 'angle cut' or sand the cuts a certain way so that when you stitch them together to butt up against each other very tightly. Some folks literally cry when the stitched together pieces have a 1/4 gap between them (I've screwed up and have had gaps over 1 inch - fortunately epoxy and fiberglass can fix even these disasters).
Most folks would like to have at least the inside of their boat finished 'naturally' - i.e. with clear varnish or poly, but if you screw up the cutting and stitching badly (or get sloppy and spill 'stuff' on the wood), you'll have to hide all the 'fixes' under paint.
You might also check the 'true' of the boat after stitching and before you epoxy it together 'hard'. use a string to measure the distance between the opposite corners of the boat to make sure they are the same. Depending upon the design you might need to make sure that the 'bottom' has the same curve on both sides etc. etc. Failing to do this can result in a boat with an obvious 'twist' in the hull shape. Fixing might be as simple as re-adjusting the tension on some of the cable ties, or maybe removing a bit of wood from the edge of one of the plywood panels.
SEALING THE PLYWOOD: Plywood comes in different grades and qualities. Some hold up better to water, sun and weather better than others (and can cost a lot more!). In hindsight, I like coating all the plywood surfaces with two or more coats of solvent thinned epoxy to help seal the plywood for the elements (and as a bond coat in places you will be using epoxy and fiberglass cloth). The edges of the plywood are areas that really could use the sealing - they are the weak link. Instead of thinned epoxy, I personally like a product called Aluthane (tm) which is a thin, one part aluminum based paint as an easier alternative to thinned epoxy to seal the wood. Thinned epoxy tends to drip and sag easily so you can make easily turn a simple sealing coat into a major mess requiring tons of sanding to fix. Either way, it is best to pieces before you assemble the boat so that you can seal/prime then when they are flat on the ground and the sealer coating will not sag or drip. I tend to make this mistake because I am too anxious to start putting the pieces together and create something that starts looking something like a boat.
GLASSING THE SEAMS: Most plans call for fiberglass cloth (tape) on both sides of the major seams (like the sides and bottom), but I don't think the fiberglass is necessary for most boats on the outside side of the seam. I just use exterior putty to smooth that outside seam. If you use fiberglass cloth you will see the edges of it under your final paint unless you are very good at fairing and sanding the edges of the fiberglass against the plywood. And you sanding of the fiberglass can often sand through the fiberglass right at the seam where you needed it the most. Then, what was the use of the fiberglass anyway? So, skipping the fiberglass on the outside seams saves what can be for most of us a major headache.
fiber-glassing the seams
Most plans call for 3 inch wide or 4 inch wide fiberglass tape/cloth. I like using two strips of 3 inch fiberglass tape, overlapping them and inch or so. This gives 2 layers of 'glass' over the critical seam area.
On larger boats, the exterior (and sometimes interior) wood surfaces are all covered with epoxy and fiberglass cloth. This adds lots of strength (strength comes mostly from the fiberglass cloth), but also lots of weight.
FILLET OPTIONS: Curved epoxy fillets along where the sides and bottom of the boat meet add strength and provide a gentle curve for a fiberglass skin. That said, I like to fiberglass the seam without the gentle fillet curve (there will be lots of voids and air bubbles under the fiberglass along the seam) then put (create) the fillet over the uneven fiberglass tape filling, masking and hiding the fiberglass tape under it.
FILLING IN THE FIBERGLASS WEAVE: Your initial coat of clear marine epoxy on the white fiberglass cloth will turn the cloth clear but the weave of the cloth will still be exposed. Most folks want to hide the cloth weave. It can take 2 or 3 or more coats of brushed on epoxy to finally fill in the weave. An alternative, if you plan to paint and not 'clear coat' with varnish or poly for natural look, is to use thickened epoxy or conventional putty to fill in the weave (followed by more sanding). So people like to leave the fiberglass weave exposed on the inside of the boat, letting it serve as a non skid surface. If keeping the weight of the boat down is important, then leaving the extra epoxy off is also an option (epoxy is about 10 pounds per gallon).
The way you treat the fiberglass weave issue will greatly affect how much epoxy you ultimately use.
SANDING: get a coarse sanding pad for your right angle grinder (replacing the 'metal' wheel). Just a brief tough and epoxy lumps, excess wood etc. disappears.
FINAL PRIMER COAT: I find that when I'm done sanding, grinding, applying putty etc. It is best to apply a solid color paint or primer over everything that will not be finished natural with varnish. I like aluthane for this. It seals the putty and other fixes. More importantly, the uniform colored finish shows places that looked fine before but still need more attention/sanding/leveling. It also gives a uniform base coat of color and texture under your final topcoat.
FINISH COAT: exterior latex 'house and trim' paint works well - just not high gloss. The house paint market is so huge, that is where the paint companies put their research dollars and competition keeps quality and prices good. Look how many years wooden beach houses go between paint jobs. Of course you can also use hardware store enamel paint, or just about anything else you want to use.
THICKENED EPOXY: There are several different products you can use to turn the honey like epoxy into a paste or cream or putty. Note that all these thickeners will turn the clear epoxy into a colored epoxy (usually a white or off white or a tan). No clear, thick epoxy. Fumed silica is the most common thickener. It is very light and somewhat difficult to blend into the epoxy. Wood flour is very fine saw dust and results in a tan color. Other fillers, like EZ thick (cellulose dust) are also often used. Note that it takes about 2 parts of thickener to 1 part of epoxy to make about 1 part of thickened epoxy.
Pre thickened epoxy, like Wet Dry 700 (tm) which is thickened with Kevlar (tm) and feldspar is another option (for excellent for 'fixing' those construction 'mistakes").
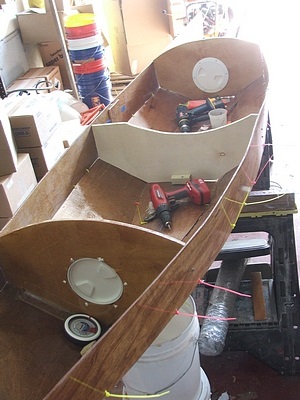
adding access ports, other tasks
Basic No Blush (tm) marine epoxy is our product. It has its own web page - CLICK). Basic No Bush is a formulated epoxy. Only 4 or 5 marine epoxies are formulated epoxies. This means their manufacturer begins with the raw resins and curing agents made by the major chemical companies and then adjusts/adds to them to formulate their marine epoxy.
This product is featured on the GreatThings4u.com website
The other marine epoxy vendors (the low price guys) are 'barrel to jug' repackagers. They simply order jugs of material from the major chemical companies and pour those resins directly into jugs for sale to end users.
The Wind & Oar Boat School is located in Portland, OR (http://wind-and-oar-boatschool.org/).
Currently (7/11) they are working on a St Ayles skiff, with a group of 10 completely novice women doing the build.
Its the first all women build and the first on the west coast. The St Ayles Skiff is a Iain Oughtred design done
for the Scottish Fisheries Museum and now the cornerstone of the Scottish Coastal Rowing Project (http://scottishcoastalrowing.org/).
Last fall WoodenBoat Publications picked up the concept and got 5 high schools in Maine to start the boat and I
am mirroring the idea for high schools in Portland. The first youth boat will start this fall but in the mean time
a group of women approached me about building one too. The Wind & Oar Boat School is building communities through
building boats. We encourage groups of all shapes and sizes to experience the camaraderie, team building, collaboration,
and self confidence that arise from working towards a common goal.
When it came time to decide about epoxies, the school turned to Michael Bogoger (Dory-man) for advice. He suggested
your product and we've been extremely happy with it. The forgiving nature of the Basic No-Blush (tm) marine epoxy
has been ideal for a school situation where many people are mixing and consistency is not necessarily high. Michael
has covered our build on his blog several times and this link http://dory-man.blogspot.com/2011/06/wind-and-oar-boat-building-school.html)
is to one of his posts where you can see us using the No Blush epoxy product.
Whether you want a group team building exercise or a grade school introduction to wood and water, the Wind & Oar Boat School will tailor a course to fit your needs. Our first build is a group of 10 women, of diverse ages, who without any woodworking experience are now building a 22 foot St Ayles Skiff.
Basic No Blush is a 'non blushing' epoxy. The competitor's primary epoxies all can produce as waxy film on the epoxy surface when the epoxy cures called "blush". This product uses more expensive curing agents that do not blush. - More info - CLICK.
Basic No Blush marine epoxy is offered with a slow summer curing agent for use in hot weather and a fast winter curing agent for use in temperatures just above freezing. This makes it ideal for winter boat building projects in unheated spaces in the northern states.
Basic No Blush being used at boat
building school in the Pacific NW
(no better endorsement than that!)

boat building school
More Useful Data

|
Custom Drift Boats Check them out at: |
|
|
|
Croff Craft - just one of our commercial boat builders that use our Basic No Blush marine epoxy and India Spar Varnish |
|
BASIC NO BLUSH (tm) MARINE EPOXY - review |
||
|
|
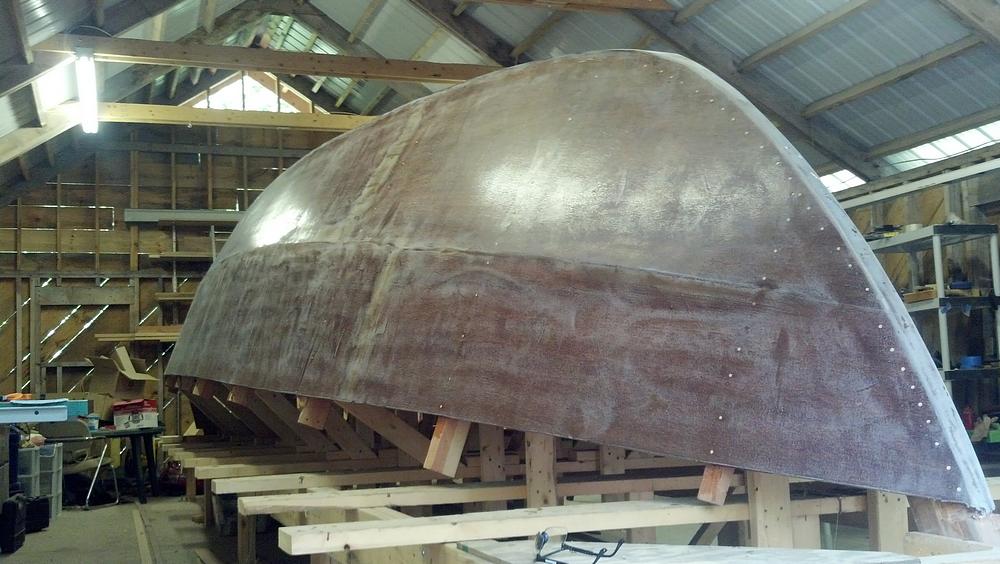
Progressive Epoxy Polymers (epoxyproducts.com) Attn: Paul, Attached is a zip file with photos, plan view, vessel description, and some shots of the previous builds of the same boat. I am using your Basic No-Blush marine epoxy as my sole epoxy coating & glue solution throughout this entire project and I just love your product! Having used all the major brands on the market today I find your epoxy to be the easiest, most consistent, and most forgiving marine epoxy product of them all. This boat is being built in an unheated, semi-weather tight workshop, on an island on Lake Winnipesaukee (central New Hampshire) and consequently I'm more often working in temperatures outside of what is optimal for most epoxies. I've had success with your epoxy (with the Regular curing agent) setting up in temps in the low 50's and also behaving kindly with temps in the upper 80s to 90+. While pot life varies considerably in such a wide range your product is very consistent, predictable, and telling when it's time to 'wrap it up', which is definitely not so much the case with some of your competitors. In addition, your pricing is very attractive and while price is not the primary reason why I use your product I definitely appreciate the value you offer, so thank you. Jeff - 2014 - Offshore Skiff boat builder |
|
|
|
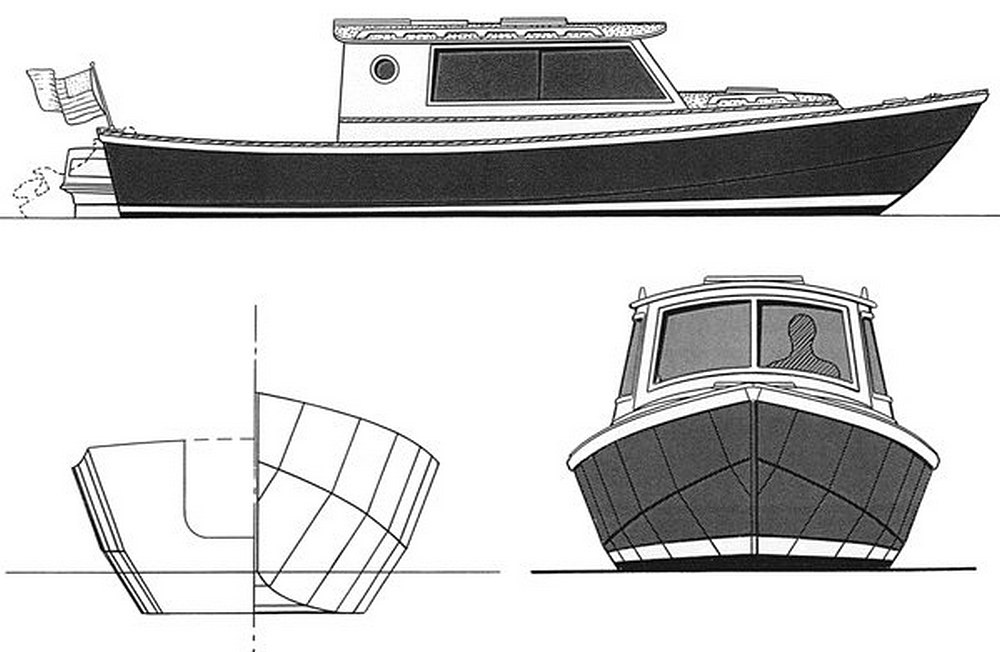
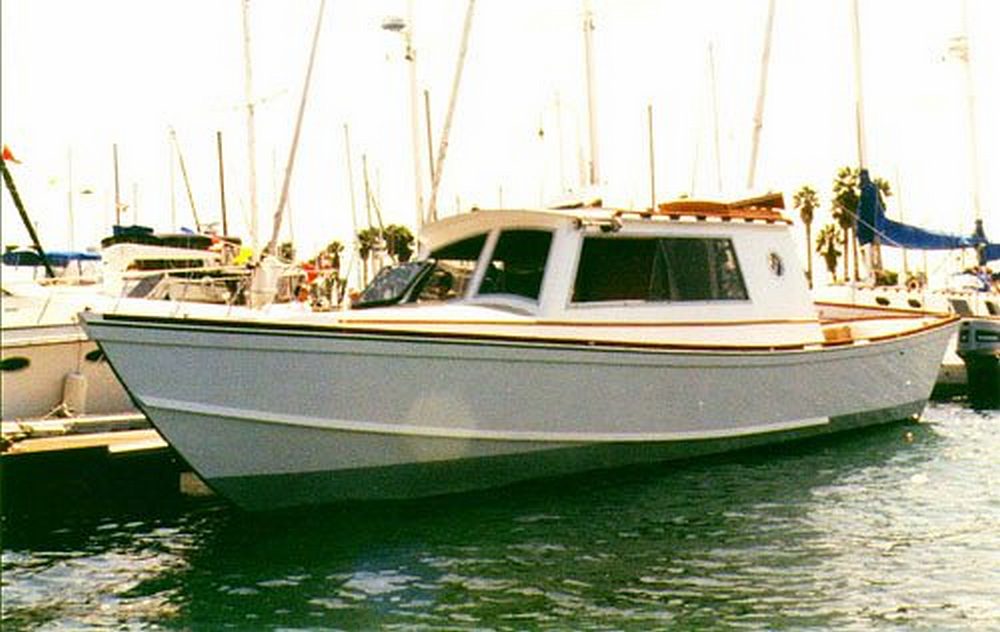
Originally designed for Offshore Magazine, the Offshore Skiff was intended to be an economical shoal-draft family cruiser or alternately--in the open center-console version--an all-around utility boat. A skiff. of course, is any fairly small, shoal, economical vessel. She could be a 15-foot rowboat, a 30-foot Jersey sea skiff, or even a 36-foot 17,000-pound Sea Bright skiff. The Offshore Skiff, falls nicely in the middle of this range at 28-feet 3-inches overall , 24-feet waterline, 8-foot beam. 5400-pound displacement, and drawing a scant 1 1 inches to the bottom of her hull. (She draws 26 inches to the bottom of her outboard.) |
|
|
Massive Boat Links Site |
Buy Now ("marine epoxy" in NAVIGATION BAR) |
BASIC NO BLUSH web page |
| Big Boat Building Project? Our BASIC NO BLUSH marine epoxy can be purchased in any gal amount over 15 gal, packed in 5 gal pails and shipped direct from the factory. Our regular 1.5 gal kits are always in stock for immediate shipping. Find Basic No Blush epoxy with pricing, in the marine epoxy section of our catalog - or call 603 - 435 -7199 |
|
One of our marine epoxy competitors (now a mere impersonal, product line sub-division within a big industrial corporation) claims a 30% savings in time using non blushing marine epoxies. Non blushing marine epoxies do not require washing or sanding between epoxy coats or top coating with other paints. Note that we offer Basic No Blush marine epoxy with fast, slow and regular curing agents (and it also includes bubble breakers for a more perfect finish). Our Premium No Bush epoxy is Nonyl free and uses an special curing agent is can be air shipped (shipped without restrictions). |

|
Epoxy Crazing Notice/Warning |
|
There are two types of Marine Epoxy Vendors: 1) discount, bulk, REPACKAGERS who simple buy drums of raw resin and raw curing agent(s) from the big chemical companies and fill plastic jugs for resale; 2) FORMULATORS take the raw epoxy chemicals add to them to enhance and improve the raw "moonshine" into a "fine whiskey". Learn more repackagers/formulators. Our Basic No Blush (tm) is a formulated non blushing epoxy by Progressive Epoxy Polymers, Inc. (homepage). that includes additions for reduced brittleness and exclusive (only we have it) bubble breakers for a more perfect looking finish. Basic No Blush is the least expensive of the formulated epoxies and considered the best marine epoxy by many ex-users of the other formulated epoxies. REPACKAGED EPOXY WARNING: Over the years I have seen and had reports of non-formulated, raw resin/cure epoxies (which are extremely hard and brittle) becoming crazed with millions of cracks (like shattered safety glass) in outdoor settings that experience big changes in temperature. Formulated epoxies all seem to be 'fixed' to allow for this expansion and contraction without cracking by making them less brittle and better able to handle internal stresses. |
|
Marine Catalog ///// Stitch n Glue ///// Epoxy Only Google Search ///// Epoxy Guru Help Site ///// Marine Boat Epoxy Etc. Links |
| "I've been using the Basic No Blush epoxy on all my own stuff, and using up all the West epoxy on most customers boats. When the West is finally gone I'll only be using your epoxies. Good stuff. I'm rebuilding an old Rybovich so a big order in the future..." Patrick (comment with on-line order 9/4/07) ---- Order No Blush online |
|
|
BOAT BUILDING SUPPLIES AND INFO |
| ///Non Blushing Marine Epoxy /// |
///Marine Epoxies (find in catalog)/// |
| ///Epoxy Fillers / Thickeners/// |
///Fiberglass Cloth/// |
| ///"Stitch and Glue" building/// |
///Underwater Epoxy Repairs/// |
| ///Varnish Info/// |
///Varnish (find in catalog)/// |
| ///Dinghy Repair/// |
///Massive Boat Links Site/// |
| ///Email Us/// |
Call 603-435-7199 help/orders |
|
Basic No Blush Epoxy VS
|
Premium No Blush Epoxy |
| BASIC NO BLUSH™ - our most popular all purpose marine epoxy resin - great value and price! | PREMIUM NO BLUSH™ - non-hazmat for quick AIR shipping and shipping outside the USA - cycloaliphatic curing system Worth considering if you want the Very Best |
|
non blushing very clear easy mix ratio (1 : 2) blendable hardeners --- slow summer, regular and fast winter curing agents nice medium viscosity no VOCs (solvent free) no formaldehyde in the formulation formulated product - not simply repackaged raw resins from the big chemical companies best prices! bubble breakers in the Part A resin.
|
non blushing easy mix ratio (1.5 : 2) cycloaliphatic curing system nice medium viscosity no VOCs (solvent free) no formaldehyde in the formulation found in some of the popular epoxies no nonyl phenol in the formulation (98% of epoxies contain Nonyl Phenol) no-nonyl means healthier and no reaction with enamel paint formulated product - not simply repackaged raw resins from the big chemical companies non hazmat to ship! Amber colored curing agent helps bring out the color of natural wood finishes
|
| We do have regular customers that exclusively like and use the Premium No Blush over the Basic No Blush. The amber non hazmat curing agent (the Basic No Blush has a clear curing agent) provides a bit of warm color and maybe hides some of the UV Yellowing. I've hard reports that it is a slightly softer finish too (soft means more impact resistance). A very Premium marine epoxy at a price of about that the other guy's charge for their 'regular' epoxy. | |
|
Basic No Blush marine epoxy has a long list of private and professional boat builders. Most recently (2016 -2017) The Drummond Island Tall Ship Company built the 72 foot schooner Huron Jewel using Basic No Blush epoxy. (CLICK HERE) Over 160 gallons of epoxy were used - switching from the standard curing agent to the winter and summer curing agents as the seasons changed. Other professional builders include a Drift Boat company, a boat building school, and it was used to construct one of the boats in a 'row across the Atlantic' competition several years ago. Read about the professional restoration of a Thistle Class sailboat with our epoxies. Some of our other epoxies can be applied underwater have been used to rebuild a 100 year old wooden marine railway in 12 feet of water and repair and raise a sunken yacht at a Pacific Island Atoll. Read all about it in the book "Escape From Hermit Island" available at Amazon.com. From Stitch and Glue kayaks to 72 ft schooners to emergency underwater repairs - you can trust the epoxies from Progressive Epoxy Polymers, Inc. - a Better Business Bureau supporter/member. - Company VIDEO - 603-435-7199 |
| WINTER BOATING: Don't let winter stop you boat repairs/building. Basic No Blush marine epoxy with fast winter cure works down to about 38 degrees. Aluthane mcu aluminum paint can be applied down to about 40 degrees. |
|
Why Basic No Blush (tm) epoxy is the BEST in its class: 1. A formulated blended resin system (not repackaged raw chemicals) 2) Uses NON BLUSHING curing agent for blush free results 3) not too thick, not too thin, not too brittle - ever see an epoxy surface with millions of tiny cracks? It is brittle, repackaged (see #1) not formulated epoxy 4) the only marine type epoxy with bubble breakers for superior flaw free finishes and uniform properties and appearance and allows for thicker, multiple layers with better clarity 5) the only epoxy adduct marine type epoxy for superior enhanced properties (standard cure only) 6) strong user support / feedback 7) 24/7 support email marineepoxy@gmail.com 8) less expensive than the other formulated epoxies which still don't have many of the advantages listed here |
Inside Our Marine Catalog:
Section One TWO PART MARINE EPOXIES- CLEAR EPOXIES
basic no blush epoxy, premium no blush epoxy, esp 155 epoxy, low v epoxy
Section Two FILLERS THICKENERS ADDITIVES
fumed silica; microsphere/balloons; poly fibers; graphite, wood flour; EZ thick; rock flour
Section Three THICKENED EPOXIES - EPOXY PUTTIES, ETC.
wet/dry 700; splash zone; epoxy cream; splash zone a-788
Section Four TWO PART EPOXY PAINTS (barrier coats)
corro coat FC 2100; water gard 300; CM 15; liqua tile 11 72 potable water; rough coat; water prime
Section Five URETHANES AND NON-EPOXY COATINGS Aluthane (aluminum coating); LPU Marine; india spar varnish; acrylic poly uv plus, polyester poly
Section Six NON-SKID DECK COATINGS
walnut shell,; s15
Section Seven MARINE REPAIR PRODUCTS
pipe wrap; fiberglass tape (cloth); Capt. Tolley's Creeping Crack Cure
Section Eight MISC. MARINE PRODUCTS
short nap rollers; TA 661 (solvent free epoxy clean-up); 1 inch foam brushes; 2 inch bristle brushes; tongue depressors
Questions? / Phone order? / EMAIL / CALL 603-435-7199 EST / BUY ONLINE
GOOGLE SITE SEARCH - Click here Epoxy specific site search
Click here - YouTube video. Learn about Progressive Epoxy Polymers Inc.
Click here - Dozens of boat repair info links across the internet. - (everything is here!)
THREE MUST READ WEB PAGES
MPRICES - 2 part marine epoxy pricing issues - CLICK HERE -
MEPOXIES - comparing 2 part clear marine epoxies - CLICK HERE - (you are here already!)
EVAL4U - how to evaluate your marine/non marine epoxy vendor - CLICK HERE -
See stitch and glue winter boat projects.....
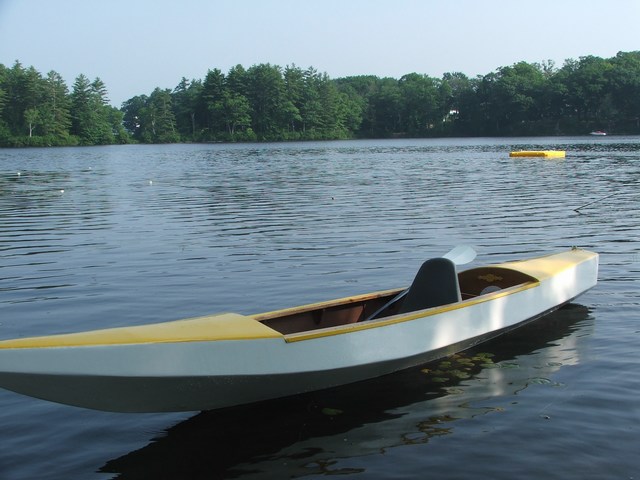
Building the Stitch and Glue, plywood, "Portuguese Style Dinghy" (winter 2008/2009) - CLICK HERE
Building TOTO (winter 2007/2008) - a plywood Stitch and Glue Kayak - CLICK HERE
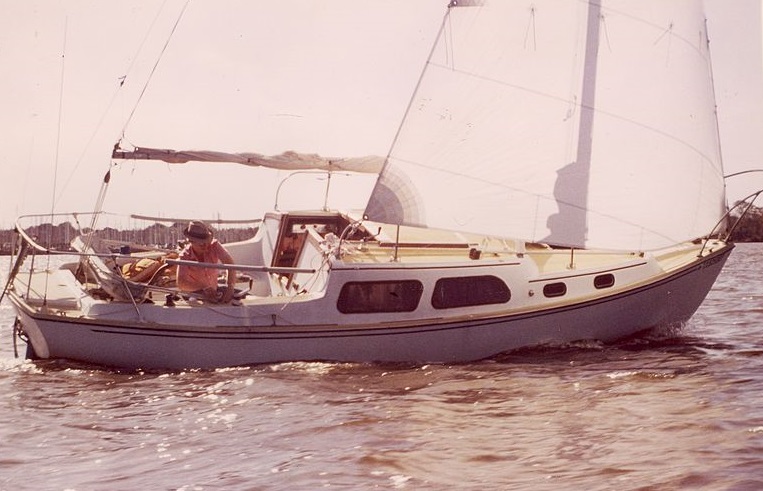 |
Progressive Epoxy Polymers' Paul Oman solo sailing his former Coronado 25, "Temptress " on Galveston Bay - early 1990s |
Did You Know ...
Epoxy coatings are used because of their
outstanding chemical resistance, durability, low porosity and strong bond
strength.
Epoxies consist of a ‘base' and a ‘curing' agent. The two components are mixed in a certain ratio. A chemical
reaction occurs between the two parts generating heat (exotherm) and hardening the mixture into an inert, hard
‘plastic'.
Epoxies yellow, chalk (or more commonly least lose their gloss), in direct sunlight (UV). The yellowing can
be a real problem. For pigmented epoxies select colors that are dark or contain a lot of yellow (such as green).
Even clear epoxies will yellow and cloud up. Often epoxies are top coated with latex or urethanes that will retain
their color and attractive gloss. This is particularly true if color coding or matching company colors is important.
Epoxies will harden in minutes or hours, but complete cure (hardening) will generally take several days. Most
epoxies will be suitably hard within a day or so, but may require more time to harden before the coating can be
sanded.
By their nature, epoxies are hard and brittle. Additives can be added to epoxies that make them less brittle,
but generally at the loss or reduction of other positive epoxy properties such as chemical resistance.
Other clues of cheap epoxies include ‘induction time' (after mixing the two components the mixture must sit
for several minutes to ‘self cook' before being applied).
The best time to recoat epoxy is within about 48 hours after the initial coat. Because epoxies take days to
reach full cure, a second coat applied shortly after the first coat will partially fuse to the first coat rather
than forming a simple mechanical bond.
End users can thicken epoxy with many things, Tiny glass spheres, known as micro-spheres or micro-balloons
are commonly used. Besides thickening, their crushable nature makes sanding the hardened epoxy easier. On the downside,
they work like tiny ball bearings, resulting is sagging and slumping. Another thickener is fumed silica (a common
brand name is Cabosil (tm)) which looks like fake snow. About 2 parts fumed silica with one part epoxy will produce
a mixture similar in texture and thickness to petroleum jelly. Micro-spheres and fumed silica can be combined together.
Fisheyes are areas on a painted surface where the coating literally pulls away for the substrate leaving a coatingless void or fisheye. Often fisheyes are caused by surface contaminants such as a bit of silicon, wax, or
oil. I have also seen them on clean plywood where epoxies paints have been used as sealers and the problem might
be due to uneven saturation (soaking-in) of the epoxy into the wood. Surface tension plays a big part in fisheyeing.
There are some additives that can be mixed into the epoxy that will reduce surface tension. Likewise, on wood,
applying several coats of solvent thinned epoxy, instead of one coat of unthinned epoxy, seems to work well. Applying
a thick coat of epoxy over a contaminated fisheye surface will bury the fisheye but expect the coating to peel
away in the future. As a rule of thumb, always suspect some sort of surface contamination as the primary cause
of fisheyeing.
Adding a bit of solvent to a solvent based or solvent-free epoxy is something that most manufacturers would
not officially approve of and something that might not work with all epoxies. However, it can be done (unofficially)
with the epoxies I deal with. Adding solvent to these epoxies will: 1) thin them out; 2) increase
pot life; 3) allows
them to flow off the brush/roller a bit more smoothly; and 4) perhaps allows them to ‘soak-in', penetrate, or may
be soften, the substrate just a little bit. Not change is visible in the epoxy unless 12% or greater solvent is
added. With that amount of solvent, the epoxies no longer cure with a glossy finish.
It is best to use epoxies with a mix ratio close to 1 to 1 as opposed to something 4-1, 5-1, etc. because errors
in the mix ratios can be more pronounced with the latter. That said, no matter what the mix ratio is, some epoxies
are more forgiving of mix ratio errors than others. One ‘trick' of epoxy vendors with odd or very sensitive mix
ratios is to sell calibrated pumps that disperse the epoxy components in exact amounts.
Customer Feedback
"I've been using the Basic No Blush on all my own stuff, and using up all the West on most customers boats. When the West is finally gone I'll only be using your epoxies. Good stuff. I'm rebuilding an old Rybovich so a big order in the future..." Patrick (comment on on-line order)
Dec 2008 from Doug: "The following is my opinion of a good company. My affiliation is as a DIY end user. No recompense, no funny business: I've been refurbishing our 1973 ketch and have done some epoxy work in that process. I've never worked with epoxy before this. I talked to several local glass workers and researched on line to learn a bit about epoxy. I searched for different vendors and their prices. I settled on a place in New Hampshire called Progressive Epoxy Polymers. (http://www.epoxyproducts.com)
"OK...thanks for the personal touch. And for such an informative website. The navigation took me a while to grasp, but I really appreciate all the credible, helpful information you provide. This is my 3rd or 4th order over the years and I give you a A or A+ grade on all of it.
I'm a nit-picking former Polaris nuclear missile targeting and firing guy so you don't get a good grade from me unless you are on target!" -- Dave 7/14
"I just wanted to let you know that a couple of months ago I purchased 1.5 gallons of epoxy from you for injection into a port stringer on a waterski boat I recently purchased. I have owned quite a number of boats power and sail requiring repairs to bring them back to where they should be. Your product was excellent in every respect. I thinned it myself to the specifications I felt the repair required and it turned out superb in every regard. I will be using your product in the future for blister repairs to a large sailboat I own and just wanted to thank you for providing an excellent product with value to the consumer." Best Regards, Steve
"Thanks for all your advice, tips & moral support concerning my project. It turned out beautiful. Quality people backing a quality product is the only way to go!" Joe
** Quick EMAIL / ph 603.435.7199 EST / Google SITE SEARCH / Buy On-line TWO STORES / Goto Contact PAGE / Web Product CATALOG / Progressive Epoxy HOMEPAGE / View our VIDEO / Navigation Bar REPLACEMENT / Data and MSDS PRODUCT INFO / Epoxy Guru HELP SITE / Top Selling Products - FAVORITES * *