 |
"BEST" FLOOR EPOXY |
|
PROGRESSIVE EPOXY POLYMERS, INC.
GOOGLE SITE SEARCH - Click here
Nothing but Quality Products at Good Prices, Great Customer Service, and Lots and Lots of Helpful Information
and NO SALES TAX - You are shopping in TAX FREE New Hampshire
EPOXY FLOOR PAINTAPPREHENSIVE?
New to Epoxies? (They can be $$$). Let's talk (603 - 435 - 7199 or EMAIL) and put yourself at ease with a 1 on 1 conversation about your project, which products will work best for you, and how to use them. After purchase "handholding", support, and encouragement are also available anytime. We freely share our 20 plus years of epoxy experience and problem solving experience. If our owner, Paul Oman, is not available he will return your call quickly. Emails are answered all day long. Without potential customers, repeat customers, and friends like you that want some free, quick advice, New Hampshire based Progressive Epoxy Polymers, Inc., a Better Business Bureau member, would not exist. Thank you in advance and thank you for visiting epoxyproducts.com. We appreciate you interest in our company.PRIMARY STORE LINK --- TOP SELLING PRODUCTS --- EPOXY GURU HELP SITE --- EPOXY DATA SHEETS
Latex with Epoxy Floor Systems
epoxies since 1994
|
"BEST" FLOOR EPOXY |
|
epoxy floor paint with latex faux finish
Use latex paint with your dry epoxy floor paint - even faux finish floor options
Your Host and Tour Guide:
Paul Oman, MS, MBA - Progressive Epoxy Polymers, Inc. (floor epoxies, marine epoxies, underwater epoxies, repair epoxies)
Member: NACE (National Assoc. of Corrosion Engineers), SSPC (Soc. of Protective Coatings)
"Professionals helping Professionals"
PROGRESSIVE EPOXY POLYMERS, INC.
|
PAGE AND SITE NAVIGATION |
|||||||||||||||||
Epoxy Floor Links Page ====> This 'Linked To' Sub-Page
No Sales Tax applied. Save Money, you're shopping in Tax Free New Hampshire
MEMBER: Internet Epoxy Confederation (IEC - CLICK HERE TO VISIT) -- "Where Professionalism Still Matters"
We've been selling epoxy - marine epoxy (boat building - wood / fiberglass repair) industrial coatings - garage paint - underwater epoxies - thick putties - tabletop resins and supplies since the early 1990's |
Professional contractors apply our Industrial Floor Epoxy (tm).
Now you can too! catalog page or buy now
I get lots of calls and emails from people wanted to highly decorative epoxy floor
paint in
their kitchens, bathrooms and garages. The problem with a fancy colored quartz sand or vinyl chip broadcast epoxy
floor is the high cost and uncertainty of buying relatively large minimum order expensive sacks of colored sands
or vinyl chips for small areas. Then there is the concern of the clear epoxy yellowing and becoming cloudy with
exposure to sunlight, such as through a window or open door.
The Home Floor System we've developed is meant for the do it yourselfer working in realatively small areas. The essence of the System is a good quality acrylic latex paint which you get at your local hardware store and your own imagination. You create you own ‘pattern' of what is known as ‘faux' painting. In faux painting you use different shades or colors of latex paint applied in an irregular pattern using sponges, crinkled paper, drips of paint, etc to create a variety of looks. There are entire books on Faux painting techniques available. Once done, the faux latex pattern is sealed in a clear top coat.
Various grits can be added to any of the layers for non slip options.
We don't offer any warranty or guaranty and offer it only as a suggested technique that you might wish to follow
at your own risk and liability.
Note: this system can go over wood, cement or tile. Generally works over vinyl, but no promises here. The base
epoxy floor paint will self level and fill in cracks and seams. However, keep in mind that a gallon of any liquid will only
cover 6.5 square feet if applied at 1/4 inch thick.
We really appreciate you visiting PROGRESSIVE EPOXY POLYMERS, INC. and our web site: EPOXYPRODUCTS.COM. Take advantage of the CONTACT links on this page to ask questions about our products and/or your projects. You can stay in touch with us via our NEWSLETTER (link on our contact page) which is emailed every 6-8 weeks.
This current page is all about:
epoxy floor paint with latex faux finish
Use latex paint with your dry epoxy floor paint - even faux finish floor options
|
|
WOW! 35% - 40% of all daily online or telephone orders are from existing customers. That's an amazing 'REPEAT CUSTOMER" number. |
|
603 - 435 - 7199 ANYTIME 24/7 FOR HELP OR ORDERS |
|
|
|
|
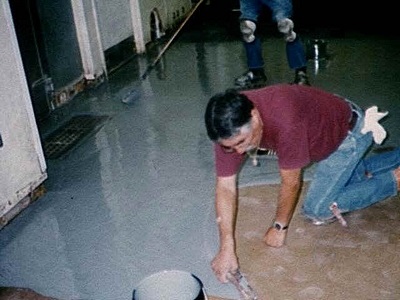
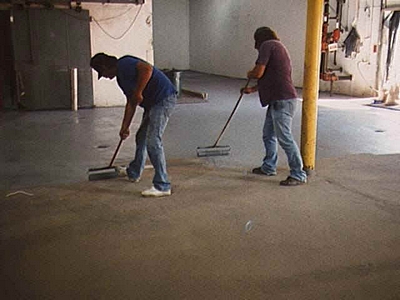
The ELA System (Epoxy-Latex-Acrylic)
System
1) clean the floor and coat it with one coat of our industrial floor epoxy.
2) let cure for 48 hours.
3) paint the epoxy with a water based latex paint. Using several colors and ‘sponge painting' almost any ‘faux'
finish in any color/look can be achieved.
4) let dry for 48 hours.
5) optionally topcoat your custom latex floor with our durable 2 part polyurthane
- Acrylic Poly Plus UV - or some other clear
topcoat product. Note that this product has strong solvent fumes, use in a ventilated area - also not for sale
in CA.
6) let dry 24 hours and then optionally repeat step 5 with a second coat.
7) let dry 48 hours before use.
---------------------------
An interesting alternative: I recently tested a decorative 'stone look' spray paint from Rustoleum (called American Accents - stone creations) and an another floor option. Seems to work. Put down the epoxy base coat. Spray on the 'stone accent' Rustoleum paint. It gives a nice bumpy, multi color stonelike look. Let the paint try completely (several days). Then topcoat with our more durable 2 part polyurthane - Acrylic Poly Plus UV.
|
Links to Lots of MUST READ Information Articles About the Best Epoxy Floor Paints, Including Preparation, Alternatives, What Can Go Wrong, etc.
|
|
Bio Vee Seal - INTERNAL CONCRETE SEALER |
SOME OF THE SITES THE ABOVE LINK WILL DIRECT YOU TO |
|
Clear Top Coats - FLOOR CLEAR TOP |
Best Floor Epoxy - CLICK HERE |
|
Epoxy Quartz Floor - BROADCAST FLOOR |
Acid Etching - ACID |
|
Epoxy Paint Chip Floor - CHIPS |
Epoxy Paint vs. Floor Epoxy Paint - EPOXY PAINTS |
|
Epoxy Paint - SURFACE PREP |
Floor Basics/Options - START HERE |
|
Floor Epoxy - CATALOG PAGE |
Questions: ASK PROFESSOR E. POXY |
Epoxy Only Web Google Search
#1) Google
Everything Epoxy Searches
#2) Google
Marine Epoxies Searches
#3)Google
Floor Epoxy Searches View
our Progressive Epoxy Products, Inc.

|
FIND THIS/THESE PRODUCT(S) IN ONLINE CATALOG PAGE AND ONLINE STORE FRONT |

 |
 |
 |
||
|
site master |
protagonist |
ground zero |
epoxy floor paint with latex faux finish
Use latex paint with your dry epoxy floor paint - even faux finish floor options