PROGRESSIVE EPOXY POLYMERS, INC.
MARINE EPOXY PAINTS
ABSOLUTE BEST SOURCE for epoxy information, options,
USA made products, 24/7/365 help, and support
Seabrook Texas, about 2007
NO SALES TAX - You are
shopping in TAX FREE New Hampshire Your Host and Tour Guide: Paul Oman, MS, MBA - Progressive Epoxy Polymers,
Inc. (floor epoxies,
marine epoxies, underwater epoxies, repair epoxies) Member: NACE (National Assoc. of
Corrosion Engineers), SSPC (Soc. of Protective Coatings) "Professionals helping Professionals"
since 1994
**
Quick
EMAIL / ph 603.435.7199 EST /
Google
SITE SEARCH
/ Buy On-line
TWO
STORES / Goto Contact
PAGE / Web Product
CATALOG /
Progressive Epoxy
HOMEPAGE / View
our VIDEO / Navigation Bar
REPLACEMENT / Data
and MSDS
PRODUCT INFO
/ Epoxy Guru
HELP SITE /
Top Selling Products -
FAVORITES * *
We are the only
technology based coating/epoxy/resin company that actively encourages your phone
calls, not just during our East Coast work hours but also after/before hours,
evening, weekends and even holidays. We're available when you are. We form a
personal relationship with our customers and freely share technical information,
how to-advice, product information and tips-and-tricks. Speak with a
non-salesman technical professional with over 25 years of experience in the
resin/coating/epoxy industry (no newbie staffer on the phone lines!). Floors,
tables, boats, leaks, rot repair. We handle it all!
We are an 'always available,'
one-on-one, technical/scientific, coating company (watch
our video). We are NOT one of those fluffy/slick mass sales firms the
dominate the internet selling cheap third party (made in China???), low end
epoxies and coatings with no real knowledge of what they are selling and
quotas to sell to as many people as possible. 603-435-7199 (east coast time).
COATING THE BILGE WITH EPOXY PAINT
(water gard 300 epoxy)
|
Why Water Gard 300 epoxy is the BEST in its class: 1. Performance boosted epoxy ADDUCT 2) can be applied underwater 3) cycloaliphatic formulation 4) not too thick, not too thin, 1 coat epoxy paint 5) special high end curing agents allow shipping by air 6) strong user support / feedback 7) 24/7 support |
| THIS PRODUCT | xx | EMAIL US | xx | |
| air shippable | xx | cycloaliphatic system | xx | |
| no nonyl phenol | epoxy adduct system | |||
| multi curing agents | bulk pricing | |||
| solvent free | xx | no Calif. sales | ||
| 2 part epoxy | xx | 2 part poly | ||
| apply underwater | xx | bubble breakers | ||
| favorite(s) product list | xx | data sheets | xx | |
| PACKING - jugs/bottles | PACKING - cans | xx | ||
| find in non marine cat | xx | find in marine catalog | xx | |
| PRICES/ind/commercial | xx | PRICES/marine section | xx | |
| BUY online | xx | BUY online | xx | |
| home page | xx | contact page | xx |
|
What Makes Water Gard 300 (tm) A Superior Epoxy Coating For Your Application? Water Gard 300 is not a simple epoxy paint but rather an epoxy adduct. In general terms epoxy adducts have some of the Part A resin added to the Part B curing agent during manufacture. The result is improvement in most of the coating's physical properties (which is way you are using an epoxy in the first place). This includes reduced yellowing, better curing and a host of other property improvements. A better epoxy for better results! Learn more about epoxy adducts at the Vanguard Concrete Coating web site. |
|
Under a different original label Water Gard 300 was approved for potable water and approved with only a handful of other coatings for nuclear reactor use. Water Gard 300 (tm) is one of the highest performance, best quality epoxies in the Marketplace. |
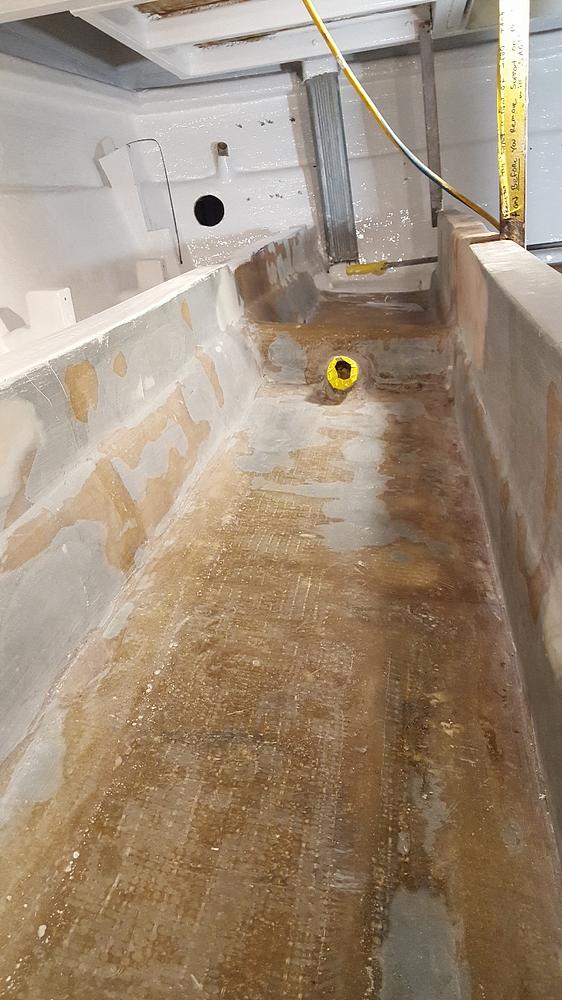
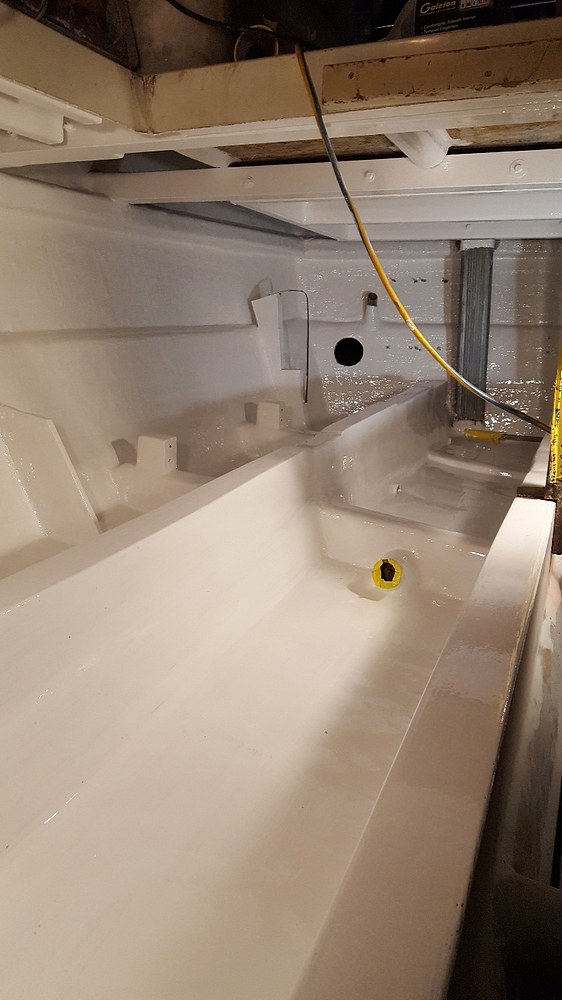
From David Dawson's 2010 marine blog -
coating his bilge with Water Gard 300 epoxy paint:
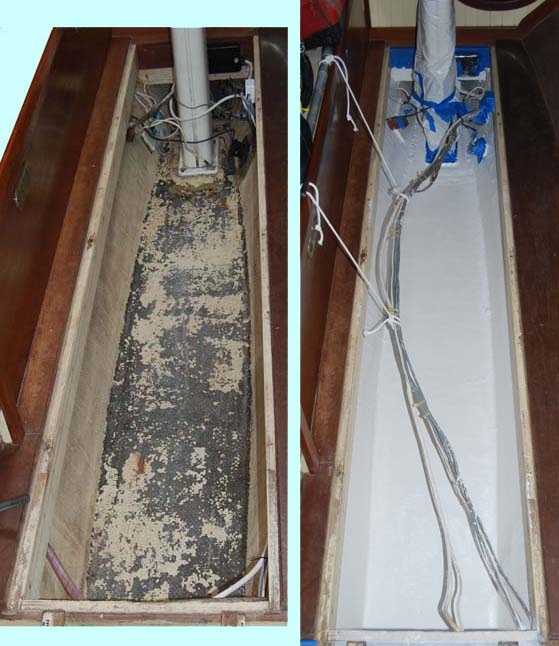
Much, though not all, of the paint flaked off as we cleaned and degreased the bilge. Our goal is to have a bilge
that is clean, as dry as possible, with the fiberglass protected from the effects of water.
After debating the merits of various paints and coatings, we decided on a two-part epoxy paint that bonds a hard,
shiny, white shell onto the fiberglass.
We ordered a supply of Water Gard 300™, an "Immersion Grade Cycloaliphatic Epoxy," from Progressive Epoxy
Polymers — two gallons of the Part A white pigmented base, plus 1 gallon of the Part B catalyst. Paul Oman has
a very helpful website and communicated well via email while we were researching coatings. The Water Gard 300 is
low in VOCs and was not unpleasant to work with — even in the cramped, unventilated confines behind the engine
— but the Xylol we added to thin the Water Gard, even in the small amounts we used, was very irritating and required
opening hatches to vent while working.
This product is a Progressive Epoxy
Polymers, Inc. best selling, favorite product. Visit our FAVORITES - 7
EPOXIES THAT WILL FIX ANYTHING web page
at:
epoxyproducts.com/favorites4u.html View other popular one-of-a-kind
products.
I began with the easiest part of the bilge — the salon portion — accessible, shallow. After the first day, I phoned
home, complaining that it was the messiest, most difficult project I'd ever undertaken, and that I would never
do it again. The stuff soaked through my clothes, coated my skin, every single tool, and all my carefully-taped
drop cloths, with sticky white goo.
After removing and bagging all of the drop cloths, I changed clothes and carefully laid them out to dry. That night,
I spent a sleepless hour mentally refining my technique and fretting about putting on the second coat.
Next day, I donned my paint outfit, which had "cured" overnight. I felt like the Tin Man. Things went
much better — so much so that I finished the salon bilge, put down a first coat in the head bilge and the forepeak
chain locker, and had enough energy left over to tackle some other smaller projects on the winter punch list.
This was mostly a one-person project except for the aft bilge. There, one person (me) wedged herself next to the
engine with brush or roller in hand, while a second person (partner) mixed Part A and Part B and handed it in when
needed.
We found that painting the upper part of the forepeak was also easier with two people, though it could be done
alone, albeit less conveniently.
The quantity of Water Gard we ordered was just enough for two coats everywhere except the upper part of the forepeak.
We used extra material on the aft bilge in an effort to make sure the less accessible surfaces were thoroughly
coated. If not for this, we probably would have been able to get a second coat into the upper half of the forepeak.
Epoxy paint tools and techniques
The temperature inside the boat ranged from about 58° F to 68° F. I discovered that batches of 18 ounces
total material were just about right for applying before it began to kick.
Because the ratio of Part A to Part B is two to one, I bought an 8-ounce measuring cup and a 4-ounce measuring
cup, plus two spatulas, one wide and one narrow. I thought it would be important to have distinct measuring and
scraping tools for Part A and Part B so they would never become mixed by mistake.
I used a tall 24-ounce plastic container to mix the components together. For each batch, I measured out 12 ounces
of Part A (one and a half of the larger measuring cups) and scraped it into the mixing container. Then I measured
out 6 ounces of Part B (one and a half of the smaller measuring cups) and scraped it into the mixing container.
Finally I added 1 ounce of Xylol, to thin it just a bit. I used a VSR electric drill with a mixing bit to blend
the ingredients. — — — Be careful, the mixture is very thick and the drill must be driven at a very slow speed,
or a huge mess can result! I speak from experience, alas.
After each session was done, I discarded the mixing container; but I cleaned up the mixing cups and spatulas with
Xylol.
Just as a certain collection of brushes was important to the success of the bilge cleaning chore, the right tools
are essential to the success of painting with two-part epoxy.
First, I taped edges, hardware, and wiring with blue painter's tape. The engine, the mast in the salon and the
bitts in the forepeak were completely covered and taped off with a drop cloth and plastic garbage bags.
I used the cheap, hairy, tan brushes sold at paint stores to "cut in" — if you can call the pushing-around
of thickened goo "cutting in" — around edges, hoses, hardware, into corners, and so on, where rollers
or paint pads would not be useful. The 4-inch and 2.5-inch widths were handy. Don't waste money on better brushes;
you will throw them away after each painting session. In the aft bilge, I used duct tape to secure the brush onto
a wooden handle, and was able to paint the narrow aft wall and all the inside-turning edges of the bilge; it was
sloppy but effective.
Most broad expanses of the bilge were painted using a paint pad. Following advice gleaned on the Internet, I bought
a red Shur-Line™ applicator and a supply of 9-inch paint pads. Supposedly, this brand stands up to the rigors of
the thick epoxy paint. It did, though the paint pad tended to pop out of the applicator when I held it by the handle
— I ended up getting a good grip on pad and applicator together, ignoring the handle, and it worked just fine.
I'd pour a ribbon of epoxy paint onto the paint pad and then wipe it onto the bilge surface, then dragged it across
and down several times to spread the paint. The material went on smoothly and evenly this way. Avoid going back
and forth too many times, especially after you've moved on to another section, because you will create drag marks
as the stuff begins to kick.
Finally, I used a roller, designated for use with epoxy, on a telescoping handle in the deep aft bilge. Here, I
poured a ribbon of material right on the vertical bilge sides, then used the roller to push it around as evenly
as possible. I wasn't able to see well the side nearest where I was wedged behind the engine, but on inspection
later (with mirrors and crouching in the bilge forward of the engine), I found I hadn't done such a bad job covering
everything.
In the end, I've become a fan of two-part epoxy paint. I would definitely use it again.
This product is a Progressive Epoxy Polymers, Inc. best selling, favorite product. Visit our FAVORITES - 7 EPOXIES THAT WILL FIX ANYTHING web page at: epoxyproducts.com/favorites4u.html View other popular one-of-a-kind products.
COATING THE BILGE WITH EPOXY PAINT (water gard 300 epoxy)
ADDITIONAL CUSTOMER EXAMPLES
|
|
|
|
|
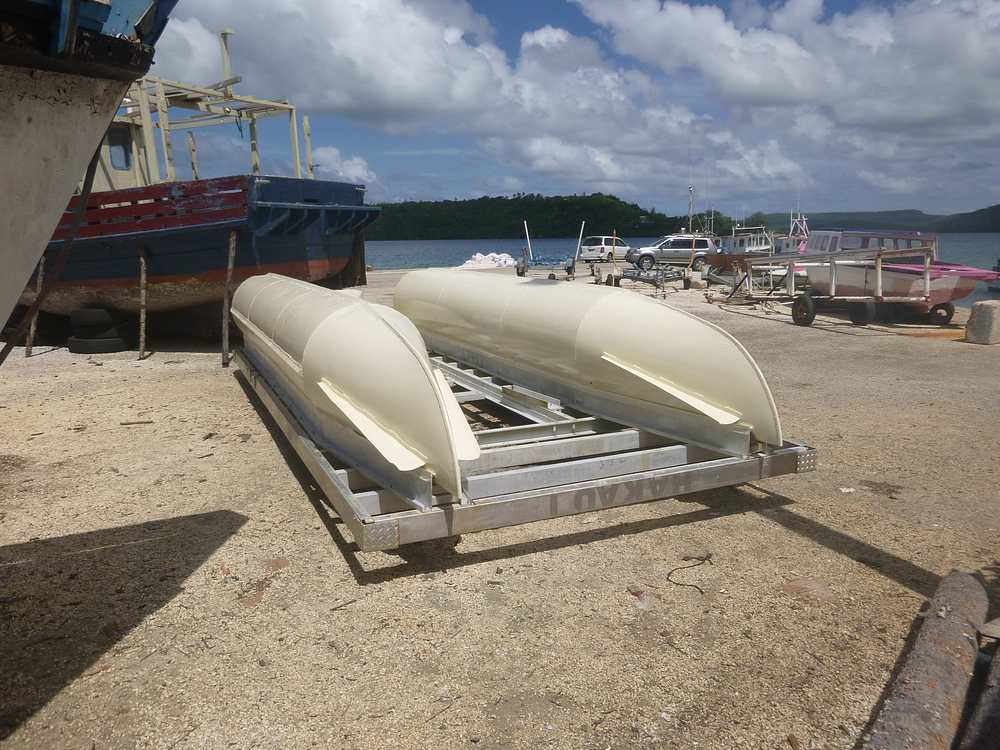
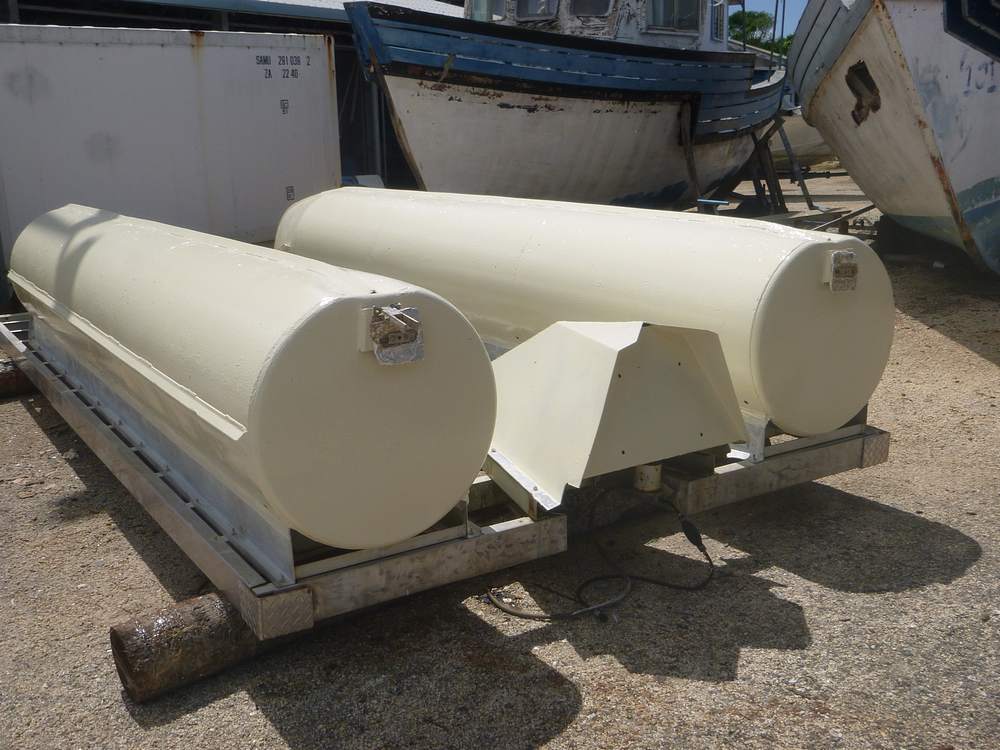
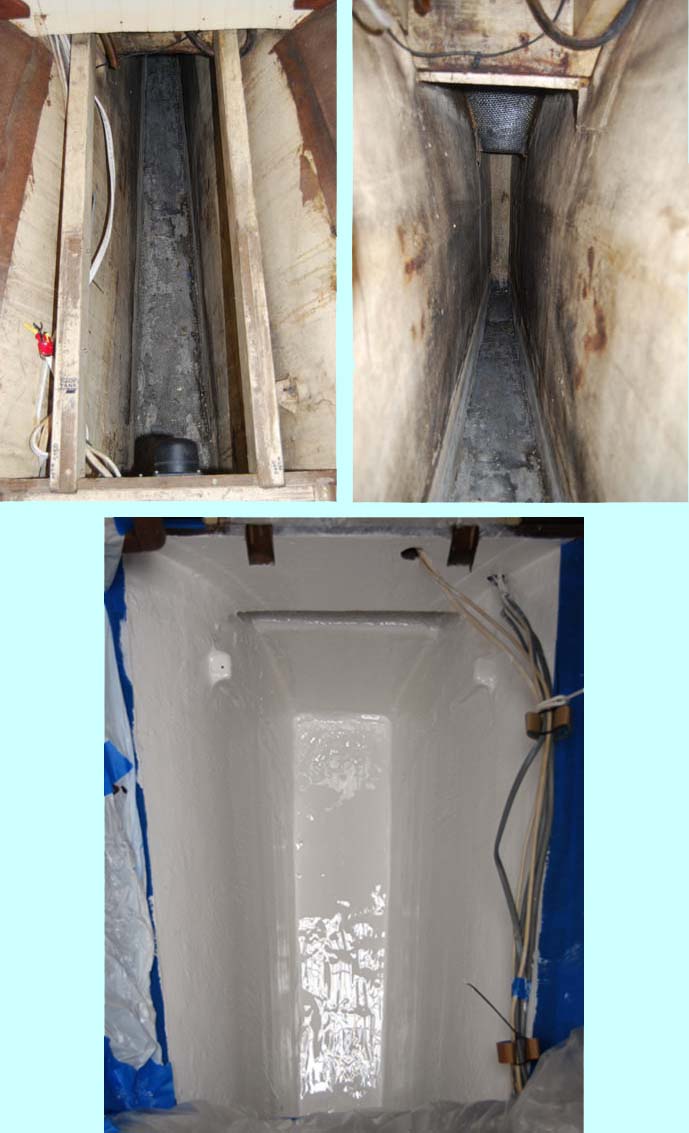
Tonga Based Dive Boat Pontoons Refurbished with white Water Gard 300(tm) Epoxy Paint |
|
|
|
|
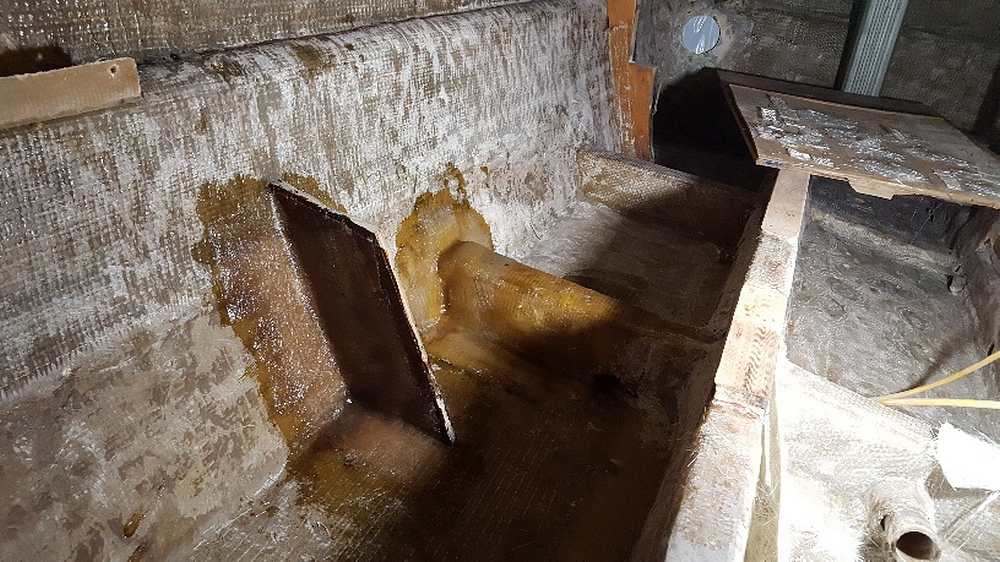
ABOVE - Bilge #1 before Water Gard 300 Epoxy Paint |
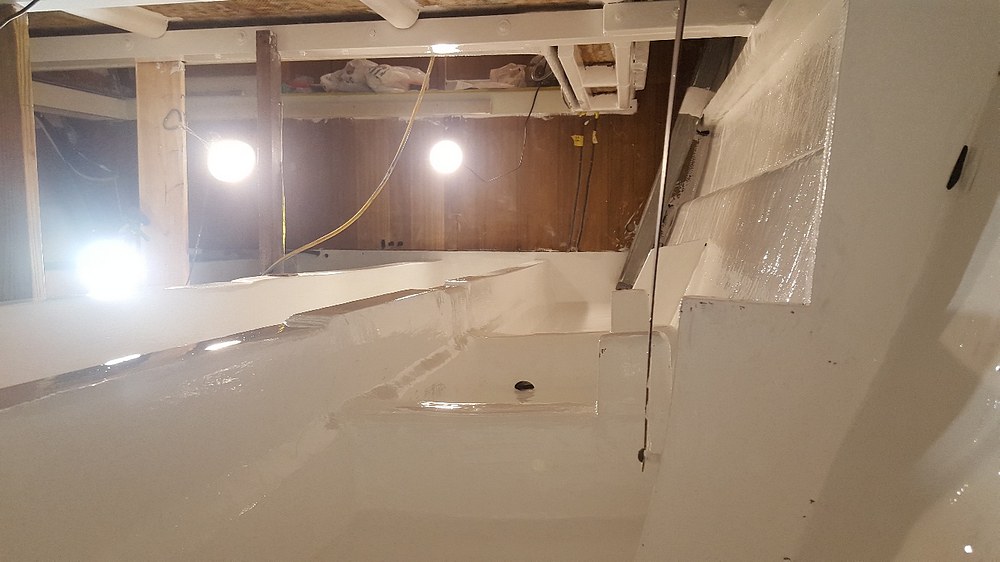
ABOVE - Bilge #1 after Water Gard 300 Epoxy Paint |
|
|
|
|
ABOVE - Bilge #2 before Water Gard 300 Epoxy Paint |
ABOVE - Bilge #2 after Water Gard 300 Epoxy Paint |
"Thanks for sending out more water guard. It's obviously a great product.
A little challenging to get it to flow out but its the nicest bilge coating we have ever used.
Attached are some photos of my commander (1968 35 ft Chris Craft Commander) project."
Jeremy -- Custom Marine 9/18
|
Barrier Coat 101 - IN A NUTSHELL
STEP 1) Prep the hull removing most or all of the existing paints and coatings. STEP 2) Fix any blisters as per epoxyproducts.com/blister4u.html using Low V epoxy and Wet Dry 700 kevlar (tm) underwater epoxy (the Wet Dry 700 is one of our epoxies used to save the sunken yacht Banshee it can be applied underwater). STEP 3) Optionally prime / seal the hull with ESP 155 epoxy primer (not for sale in S. California). Generally used to help sealing and bonding on abrasive blasted (i.e. 'damaged') hulls, sun weathered hulls, or old fiberglass. About 75% of owners prime/seal with ESP 155. STEP 4) Using short nap rollers apply a coat of epoxy barrier paint (yielding about 8 - 12 mils of thickness - most sources recommend 10-12 mils). Use CM 15 epoxy on hulls that have a bit of flex or if applying in hot weather (CM 15 has a long pot life and more than ordinary epoxy flex. - coverage 1 gal covers about 150 sf). Most owners use our Water Gard 300 epoxy paint sold in light blue or white - 3 gal unit covers about 400 sf. Also used as a bilge coating). Owner also use our gray, Kevlar (tm) reinforced, epoxy paint called Corro Coat fc 2100A. A 1.5 gal unit covers about 150 sf. It is also one of the other epoxies (applied with fiberglass cloth underwater) to save the sunken yacht Banshee. The Water Gard 300 and the Corro Coat fc 2100A also make a good bilge coating. STEP 5) 'Scratch up' the surface (recommended) and apply your bottom paint as per manufacturer's direction. Or consider the 'copper epoxy' option (fine copper powder mix into a thin epoxy - our Low V epoxy - and applied to the hull. ALL PRODUCTS MENTIONED AND HIGHLIGHTED IN RED CAN BE ORDERED FROM OUR PRIMARY 3RD PARTY STOREFRONT: CLICK HERE OR BY CALL ANYTIME 603-435-7199 TO ORDER OR WITH QUESTIONS. MASSIVE BOAT - EPOXY - REPAIR - BUILDING BOAT LINK SITES (worth your time to investigate) BASIC NO BLUSH marine epoxy - the best and cheapest FORMULATED non blushing marine epoxy |
MORE HELPFUL LINKS
|
The Marine Epoxy Everything Guide Everything from user reviews, repair examples, pricing issues and vendor evaluation tips
Basic No Blush Marine Epoxy Product Page Marine Epoxy Catalog page (multiple epoxies) Basic No Blush Marine Epoxy User Reviews / Feedback How To Evaluating Marine Epoxy brands and Vendors Marine Epoxy prices - what it really costs! Marine Epoxy amine blush - what is epoxy Blush? Boat repair examples using Marine Epoxy Dinghy Marine Epoxy boat repair case study Progressive Epoxy Polymer's marine web site Massive site of Internet boat links
|
Inside Our Marine Catalog:
Section One TWO PART MARINE EPOXIES- CLEAR EPOXIES
basic no blush epoxy, premium no blush epoxy, esp 155 epoxy, low v epoxy
Section Two FILLERS THICKENERS ADDITIVES
fumed silica; microsphere/balloons; poly fibers; graphite, wood flour; EZ thick; rock flour
Section Three THICKENED EPOXIES - EPOXY PUTTIES, ETC.
wet/dry 700; splash zone; epoxy cream; splash zone a-788
Section Four TWO PART EPOXY PAINTS (barrier coats)
corro coat FC 2100; water gard 300; CM 15; liqua tile 11 72 potable water; rough coat; water prime
Section Five URETHANES AND NON-EPOXY COATINGS Aluthane (aluminum coating); LPU Marine; india spar varnish; acrylic poly uv plus, polyester poly
Section Six NON-SKID DECK COATINGS
walnut shell,; s15
Section Seven MARINE REPAIR PRODUCTS
pipe wrap; fiberglass tape (cloth); Capt. Tolley's Creeping Crack Cure
Section Eight MISC. MARINE PRODUCTS
short nap rollers; TA 661 (solvent free epoxy clean-up); 1 inch foam brushes; 2 inch bristle brushes; tongue depressors
Click here - Dozens of boat repair info links across the internet. - (everything is here!)
THREE MUST READ WEB PAGES
MPRICES - 2 part marine epoxy pricing issues - CLICK HERE -
MEPOXIES - comparing 2 part clear marine epoxies - CLICK HERE - (you are here already!)
EVAL4U - how to evaluate your marine/non marine epoxy vendor - CLICK HERE -
Legal Stuff / Returns
NOTICE: Legal notices, Terms of Service, warranty information, disclaimers, health warnings, etc. are required reading before using web site, ordering and/or using Products. Any such use and/or ordering, online or by telephone, shall constitute acceptance and knowledge of all such terms.
CLICK HERE to access these terms. Please note: Whenever you purchase from this web site, and with each new purchase, you are granting us full and complete permission to add you to our email newsletter list at our option.RETURNS: call or email for authorization to return. Returns are subject to a 25% restock fee. Customer pays return shipping and must comply with federal DOT shipping requirement/labeling for hazmat epoxies under penalty of fines and legal action.
** Quick EMAIL / ph 603.435.7199 EST / Google SITE SEARCH / Buy On-line TWO STORES / Goto Contact PAGE / Web Product CATALOG / Progressive Epoxy HOMEPAGE / View our VIDEO / Navigation Bar REPLACEMENT / Data and MSDS PRODUCT INFO / Epoxy Guru HELP SITE / Top Selling Products - FAVORITES * *
"The Right Epoxy fixes Everything!"
Visit our Subject / Catalog contents PAGE