Progressive Epoxy Polymers, Inc.
"Your Friend in the Epoxy Business"
Pittsfield, NH 03263
Quick EMAIL / ph 603.435.7199 EST / Google SITE SEARCH / Buy On-line TWO STORES / Web Product CATALOGS
GETTING STARTED - THINGS YOU SHOULD KNOW BEFORE YOU START (EPOXY 101)
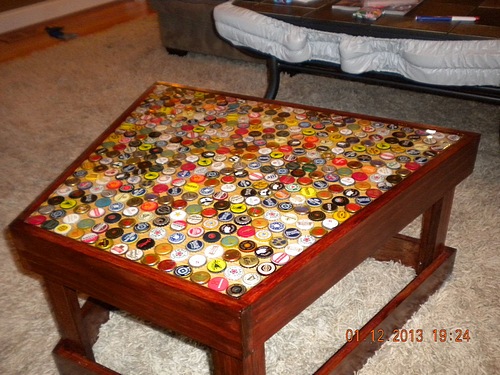
Great feedback about our Table Top Pour epoxy
from a professional table top epoxy company
(TROY 10/2023):
"Working with your epoxy was night and day
difference between the cheaper stuff.
Poured smooth and the bubble breakers
were really great. Great consistency"
The difference between high end epoxies formulated for table tops
and bar tops vs. low quality, low end Chinese imported epoxy sold
by USA based marketing companies with slick websites and
no knowledge of epoxies. Call and talk to the owner 603-435-7199 EST
We are your best source for multiple table and bar top epoxies and non-epoxy
top coats - Penny Floor systems too!
THIS PAGE
1) EPOXY TABLE TOPS AND BAR TOPS - GETTING STARTED - INTRO PAGE - THINGS YOU NEED TO KNOW -
OTHER KEY PAGES
2) EPOXY TABLE TOPS AND BAR TOPS - PRODUCTS - MULTIPLE DIFFERENT EPOXY & TOP COAT OPTIONS - PRODUCTS
3) EPOXY TABLE TOPS AND BAR TOPS - BUYER WARNINGS - ON-LINE VENDOR SCAMS TO GET YOUR MONEY - SCAMS
CURRENT PRICES ON ALL OF OUR BAR TOP TABLE TOP EPOXIES - ONE LINE PRODUCT SUMMARY PAGE WITH PRICES
LINK TO OUR TWO ONLINE STORES - BUY HERE - ESP 155 and India Spar Varnish are not for sale in Calif. Purchase THESE FROM OUR "PRIMARY ONLINE STORE" (and don't ship to Calif.) - BUY HERE
PRODUCT DATA AND MSDS DOCUMENTS - CLICK HERE
PROGRESSIVE EPOXY POLYMERS, INC. HOMEPAGE
GENERAL EPOXY TABLE TOP AND BAR TOP INSTRUCTIONS - PDF FILE
COMPANY VIDEO - LEARN ABOUT OUR COATING AND RESINS COMPANY - TWO MINUTE VIDEO LINK
INTRO
We appear to be the only coatings company offering epoxy resin systems for table tops and bar tops. Our competitors all have slick web sites and all appear to sell the same imported epoxy (same typos and weird statements on their comments / directions -- scroll down to see actual example/proof below). They are sales folks all selling a single product that they know little about. We can offer epoxies with bubble breakers and extended working times because these are good features for most table and bar top projects and unlike our competitors we are involved in the formulating of these American made epoxy resin products.
Most coating companies do not focus on table or bar top systems, targeting instead large volume commercial projects like industrial floors, water treatment plants, etc. We are the exception. A coating/epoxy/resin company that actively encourages your 24/7 emails and phone calls. We form a personal relationship with our customers and freely share technical information, how to-advice, product information and tips-and-tricks. Speak with a non-salesman technical professional with over 25 years of experience in the resin/coating industry.
-----------------------------------------------------------------------------
Example of the Chinese import resins offered to US marketing companies with no knowledge of resin chemistry or quality. And what kind of support can you expect? Another reason to buy "American".
Hello Paul Oman,
|
Horror Stories Using Competitors' Budget Epoxies BACKGROUND: There are two types of epoxy vendors. The 'serious' professional grade epoxies are formulated by beginning with the raw resins manufactured by the giant chemical companies. Call these companies EPOXY FORMULATORS. Generally the low price epoxy vendors merely repackage these raw bulk resins. Not a good thing! Call these companies EPOXY REPACKAGERS. It is the difference between Moonshine and Jack Daniels. Use only FORMULATED SPECIAL PURPOSE EPOXIES LIKE THOSE SOLD IN THIS WEB SITE. Going cheap can have very $$$ consequences. See Below: EXAMPLE 1: A commercial epoxy pour contractor recently used our Bio Clear 810 pour on epoxy to replace a badly yellowed epoxy covered logo in the INSIDE floor of regional airport terminal with our 'almost no yellowing' Bio Clear 810 (cyclo-aliphatic epoxies to the rescue!) We don't know for certain that the original contractor used some inexpensive REPACKAGER'S epoxy, but it certainly sounds like it. EXAMPLE 2: I recently got a phone call from someone using epoxy to seal wooden tables they were selling. They were using 'cheap' epoxy from a REPACKAGER (uxcoxxxxxxxs). After six months the epoxy on the tables all exhibited millions of tiny cracks (like shattered safety glass). This wouldn't have happened with a specially formulated epoxy designed to overcome the 'flaws' of the raw resins. Bad news for them. EXAMPLE 3: Another phone caller told me how they had ordered over a hundred gallons of epoxy in two separate orders from a low cost REPACKAGER (bxxxbxxxxxxxxxy). The first batch worked fine but the second batch failed completely. The vendor knew it was their fault (bad batch? wrong barrel to jug pour out?) and refunded their money. But that didn't undo the damage done. |
PRODUCT DATA SHEETS AND OTHER REQUIRED DOCUMENTS
Epoxies are serious chemicals and sellers are required to provide product chemical data sheets MSDS or SDS documents. This provides a list of chemical used, warnings and shipping restrictions (sort of the salt and fat numbers provided by restaurants and on food labels). I see no links on the slick epoxy pour web sites for
MSDS/SDS documents. They are required be making them available to you (thus helping you know something about the quality/composition of the products they sell as well as if it is made in the USA).
Chemicals like epoxies also come with a PRODUCT DATA SHEET that give general information about the product. NO sign of them on those other sites either. Right at the top of this page you will find the link
EPOXY DATA SHEETS - that takes you to our DATA, SMDS and SDS product documentation. We're sorry our web site is not as slick as theirs - we are a coating epoxy company (in business for over 25 years). We physically touch and work with epoxies every single day.
We suggest you do a "cake pan size" copy of your project before you your primary pour. This way you have some experience with the epoxy and have a bit of the learning curve behind you and you know what to expect. Don't risk your $$$ project with something you have no experience with and no clear idea what will be happening.
How This Site is
Organized - Table of Contents
(scroll down to visit these
sections mentioned below)
SECTION 1 --- All epoxies yellow
SECTION 2 --- Epoxy coverage rates
SECTION 3 --- Downside of epoxy surfaces
SECTION 4 --- Downside of epoxy surfaces
SECTION 5 --- Thinned (sealing) first test coat - thicker additional
coats
SECTION 6 ---Top coating and protecting the
epoxy with a non-epoxy coating
SECTION 7 --- Putting the bar top into service
SECTION 8 --- What can go wrong
SECTION 9 --- Customer quotes
scroll down this page to get to each section
It is a fact. All epoxies yellow in UV
light (and even over time). Anyone that tells you they offer a non -
yellowing epoxy is not telling you the truth.
If some web site claims they have a non-yellowing
epoxy it is a lie - DON'T GIVE THEM YOUR MONEY!! Some epoxies yellow faster
and yellow more than others, but they all will yellow. That is just part
of the chemistry of epoxies.
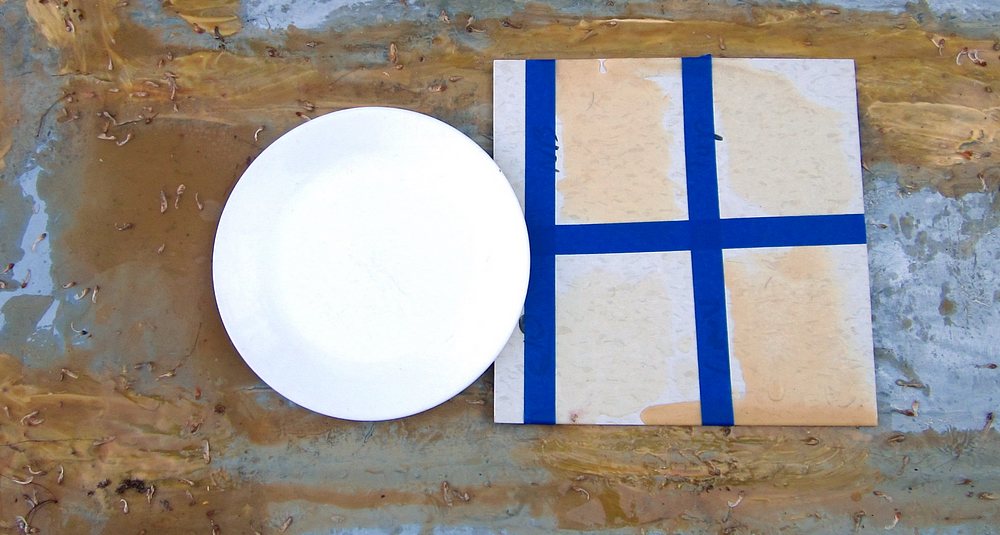
ALL
EPOXIES YELLOW IN UV
AND OVER TIME FIVE DIFFERENT EPOXIES ALL
SHOWING YELLOWING AFTER A FEW WEEKS OUTDOORS.
WHITE PLATE FOR REFERENCE (WE SHOW YOU THE UGLY
YELLOW TRUTH)
Hi Paul: I recently
purchased some clear epoxy and Acrylic Poly UV Plus from your
company. I have access to a UV chamber which simulates high altitude
direct UV exposure. I thought you might be interested in my
findings. I used a Masonite panel painted white and then coated with
the epoxy. On half of the epoxy coated panel, I brushed on one coat
of UV Poly and put it in the chamber for 644 hours at 50 C (the heat
accelerates the exposure). Attached is a picture of the results. The
masonite cracked a bit and separated due to a bit of wetness in the
wood (unrelated to the resin). The epoxy ambered dramatically
within about 50 hours. After 644 hours, the UV Poly showed a slight
bit of ambering from the original control but it is marginal at
worst. The technician who ran the test said if it isn't yellow at
644 hours it is basically indestructible. I also tested several
other 2-part resin products with the UV Poly and had the same
result. You have a great product. I now feel secure knowing that my
resin art, protected with the Poly UV Plus, will be archival and
protected for long years. I will be ordering more soon! Best, Josie (6/2010)
Order Acrylic Poly UV plus - cannot be
sold in Calif. - and all our other products at our
King
Cart Storefront. Acrylic poly UV Plus
is in the non-epoxy section.
SECTION 2 --- Epoxy coverage rates The big shocker to people considering a thick poured on clear table top is the amount
of epoxy necessary. Here are some numbers you need to know:
Stopping UV
damage and UV yellowing
----------------
Josie Lewis (6/2010) wrote:
1 gallon of anything applied 1 inch thick will only cover 1.6 square feet.
At 1/2 inch thick that gallon of epoxy will only cover about 3.2 square feet.
There are 231 cubic inches in a gallon.
"Pour on and over the edge" online epoxy sellers generally claim they put down 1/8 inch layers, but it is actually less. They claim 16 square feet per gallon, but if it was 1/4 inch thick, coverage would only be 12 square feet. Note that 2 pennies stacked on top of each other equals about 1/8 inch.
(WHY DON'T THE OTHER GUYS SHARE THIS BASIC INFO WITH POTENTIAL CUSTOMERS?)
SECTION 3 --- Downside of epoxy surfaces
** Epoxy scratch relatively easily (treat with care)
** Epoxies soften at about 160 degrees. Place a hot object on the epoxy and it will leave a permanent dent in the epoxy
Epoxy surfaces need to be treated with care.
Because of this, we don't recommend thick epoxy surfaces for countertops.
SECTION 4 --- Mixing the epoxy
Mixing: even a slightly less then perfect mixing can ruin a table pour and Murphy's Law seems to always apply.
Get everything at the same temperature - epoxy and the all surfaces and keep it that way for a day or so after the pour. Avoid applying near windows etc. where sunlight will change the temperature. Temperature changes (warmer temps) may cause bubbles to form.
Pay attention to the mix ratio of the Part A and Part B jugs of epoxy. Almost always the mix ratio is by volume, but some folks like to weigh out the epoxy. The mix ratio by volume is not the same as the mix ratio by weight.
Now, mix up batches no larger than 1.5 gallons at a time (which assumes you will be pouring out the entire batch in 2 or 3 minutes after mixing. It can be hard to mix even small batches well - the sides and bottom / side interface can be tough to mix. The best way to mix is to 'Double Mix" - mix in on container and then pour into a second mixing container and mix some more (this way the not so well mixed epoxy at the bottom of the first bucket becomes the well mixed top and center epoxy in the second bucket). Double mixing also means the epoxy will be well mixed vertically (mixing the top and bottom layers)
Don't use the tiny bit of epoxy that collects at the bottom of your mix/pour buckets a few minutes after you have poured the epoxy. This 'left over' epoxy is always suspect to being not well mixed.
FINAL NOTE
: the epoxy will feel dry and firm overnight but will continue hardening for a week or so. Don't place papers or objects on the epoxy for at least several days or they will stick or leave a dent.
SECTION 5 ---
Thinned (sealing) first test coat - thicker additional coats
The
surface to be coated is often sealed with some other product prior to pouring
the epoxy. This is necessary when pouring over old lumber etc. Also many
of the objects to be covered with epoxy need to be sealed to prevent air (and
bubbles) from coming out of them.
Generally people use a thin coat of the epoxy they are going to be using for the
pour, a clear polyurethane from
the hardware store, or marine spar varnish, or even glue.
When sealing old wood,
seal with at least 2 coats of sealer (as per customer feedback - one coat may
not be enough). Sealing prevents leaks, bubbles, and show possible bad stuff,
like grease or oil that will mess up the epoxy pour. It an also glue down
objects to be placed in the epoxy. Easier to fix before the epoxy is poured (may
not be able to fix after the epoxy is poured).
So... two coats of clear sealer recommended - let dry for several days or longer.
WE RECOMMEND YOU 'TEST' YOUR SEALED SURFACE WITH WATER BEFORE APPLYING THE EPOXY. THE WATER WILL TEST FOR LEAKS, LEVELNESS, AND BUBBLES IF SATISFIED, SPONGE THE WATER OUT - WAIT A FEW DAYS TO DRY COMPLETELY THEN POUR YOUR EPOXY.
After sealing
- priming, you can apply the epoxy in layers up to 1/4 inch thick at a time. When the epoxy sets up, it generates heat and if the epoxy layer is more than about 1/4 inch, you can get wavy surfaces do to the un-even heat. When the poured epoxy has cooled back to room temperature and firm enough to handle another 'tidal wave' of fresh new epoxy, you can apply the next 1/4 inch epoxy layer.SECTION 6 --- Top coating and protecting the epoxy with a non-epoxy coating
We often recommend top coating your epoxy table top or bar top with a few coats of our India Spar Varnish to provide UV protection and an easy to repair (re-coat) surface. The varnish is slightly amber and doesn't look good over white surfaces, but if you surface are wood or darker colors the varnish top coat will appear clear. We also have a "not user friendly, two part poly (like auto clear coat - Acrylic Poly UV plus - $$$) that can be sprayed on to provide UV and scratch protection. This is probably something you don't want to deal with unless you have some experience in 'spraying clear coat'.
(THE VARNISH AND THE UV PLUS TOP COATS CANNOT BE SOLD IN CALIFORNIA)
A marine spar varnish top coat can be polished and waxed to a mirror like finish. Remember those movies
where the bartender slings a stein of beer sliding down the bar? Apply the
varnish and then wax and polish
(or wet sand, wax and polish) it.
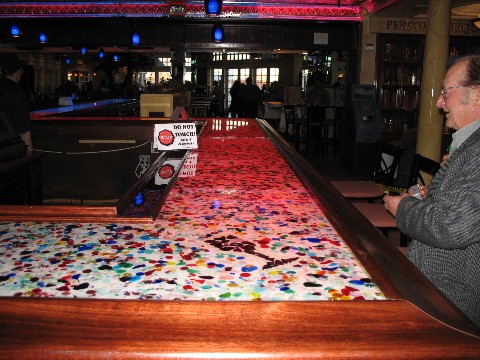
SECTION 7 --- Putting the bar top into service
The epoxy will generally feel firm and
dry overnight, but epoxies take a week or longer for full cure. You want
to wait a few days before putting the bar back into regular service. If
you leave papers or a cash register on the day old epoxy, it may ell
become epoxy glued to the surface or leave a non-removal dent in the
epoxy. Epoxies soften at about 160 degrees so placing hot objects on the
cured epoxy could result in a 'dent' that will never go away.
If the project lives outside, you want
to cover project with some sort of cover or tarp when not in use to
protect it from dirt and UV.
SECTION 8 --- What can go wrong
Scroll down to learn more.....................
8 - a Poor mixing
8 - b Leaks
8 - c Bubbles
8 - d Fish eyes
8 - e Epoxy poured too thick
8 - a Poor mixing
What happens if you do a poor job mixing?
Y
ou get sticky spots that never get hard
The fix?
Another layer of more epoxy over EVERYTHING
8 - b Leaks
Leaks when you pour the epoxy can be a real mess. It comes from not sealing the edges, seams or cracks in the slab being covered with epoxy. Not much you can do while it is leaking, tape etc will not stick to epoxy wet surfaces. You let it flow out and fix the issue afterwards.
Leaks (and air bubbles) are prevented by sealing everything before the big epoxy pour. You can seal it with epoxy, varnish, silicon seal, Emers Glue etc. After sealing, test with water. The water test will also show low level everything is and the amount of epoxy you will need.
8 - c Bubbles
Bubble can form in the epoxy for the mixing of the epoxy or from tiny cracks, spaces, voids in the surface being covered with the epoxy. Our Basic No Blush epoxy is the only epoxy bubble breaker in the formulation (which is why the Part A of the epoxy looks a bit cloudy in the plastic jug) which will greatly reduce the bubble issue especially when the bubbles are from mixing the epoxy.
Note that bubbles can be popped with a pin in many cases, but the primary way to deal with bubbles is with a heat gun or torch. Most of the videos and directions for doing this are wrong. You do not point the torch at the bubble. You run the torch parallel and about 1 inch above the epoxy surface. You are heating the air above the bubble, not the bubble or the epoxy itself. Bubbles are generally not a big issue with our epoxies, but judging from the amount of coverage at our competitors' sites, it must be for them.
8 - d Fish eyes
Fisheyes (hollow round depressions in the epoxy) Fisheye will form within about 60 minutes after the epoxy has been applied to surface.
CAUSES
Fisheyes are all about surface tension and often surface contamination of oils, waxes, silicones etc. Fisheyes are much less common in pigmented epoxies and epoxies with fillers and binders which ‘hold the epoxy together’ and preventing fisheyes. Of course, adding fillers, pigments or binders results in an epoxy that is no longer clear.
Fisheyes can result when clear epoxies are applied too thin (often to slightly contaminated surfaces, but not necessarily) with surface stresses exceed the ability of the epoxy to ‘hold together." They are much more common on smooth glassy surfaces and rare on rough surfaces.
FISHEYES ARE RATHER COMMON WHEN EPOXY IS APPLIED OVER NEWLY STAINED SURFACES. ALWAYS ALLOW 'STAINS' TO DRY FOR 1 -2 WEEKS BEFORE TOP COATING WITH ANY SORT OF COATING. Waxes, oils etc. on the surface being covered (surface contamination) are the leading cause. Was it an oily kind of wood? Was it wiped down with an oily rag? Sometimes a 'contaminated paint brush used to spread the epoxy is to blame. Sometimes you can just never figure it out.
PREVENTION
Thicker layers of clear epoxy are the answer to preventing most fisheyes. The Bio Clear 810 epoxy is so thin that it is recommended not to be applied in thicknesses of less then 1/4 inch thick (which requires and edge or dam around all edges). It is commonly used in professional bar top and table top applications.
FIX
Keep an eye on your "pour on" or brushed on clear epoxy for the first 60 minutes or so after application. If you see fisheyes forming you can generally ‘fix’ them by pouring and brushing more epoxy over the forming fisheye in the still liquid epoxy.
If your epoxy is already 'hard' when you notice the fisheyes, here are your options. If the fisheyes are caused by surface contamination then sanding down and/or adding more epoxy may or may not help - the still present contamination will sometimes (not all the time) cause more fisheyes in the new second coat of epoxy. A possible fix is to 'seal' the contaminated epoxy with a clear poly sealer and paint which MIGHT separate the contaminates from the the new epoxy to be applied over the poly sealer
BEST ADVICE
If you are into your Big Project and see fisheyes forming, adding more epoxy over them is your best fix. So, keep an eye on your clear epoxy application for about 60 minutes after you apply the epoxy and be on the lookout for developing fisheyes.
8 - e Epoxy poured too thick
What happens if poured too thick?
STRESS CRACKS
On large pours (say over 3 or 4 gallons, or maybe greater than 15 or 16 square feet) - stress cracks can form from all the different temperatures generated. The bigger the pour the thinner each layer of epoxy has to be to 'handle' all the heat. I wish I could be more exact here, but I have no 'real' numbers to offer. I have found that running a fan across the poured epoxy helps to dissipate and even-out the heat generated permitting thicker and larger pours.
RIDGES AND AN UNEVEN SURFACE
Just like the stress cracks, this is a result of too much epoxy (too thick) applied at one time. The unevenness is from the heat generated (unevenly) in the pour.
SECTION 9 --- Customer quotes
"Hello, I bought a few gallons of XXXXXXX bar top epoxy from another web site. I was planning to coat a (hardwood-veneer plywood) kitchen counter-top (stained with Minwax water-based gel stain).
I read the instructions, but also called to ask about something else (stir/pour time for 1 person with 4 gallons or more). Because I didn’t have time yet to do the coating, I was worried about kitchen-activity grease or other spots getting on the counter before it was sealed so I called the vendor.
That vendor’s web site has a lot of problems with chat windows that don’t work, etc. and when I commented on these 2 aspects of the service, the manager declined to give me any advice about the product, telling me I had not read the instructions. It HAD been a few months, so I re-read them and asked again.
He never responded, apparently not feeling any obligation, even if it meant I couldn’t confidently use the 6 gallons I purchased—a few hundred dollars’ worth! And no, I wasn’t abusive, nor anything but a little testy after learning I’d been misinformed.
So in hopes you can give general guidance, knowing I wish I had started with your site instead, and will do so in future (since theirs isn’t returnable): Thank You"
"Hi Paul, ---Thank you so much for all the info. Each time I spoke with you, I found you to be a very helpful, personable individual. You seemed genuinely interested in helping me get the right products and making sure that I know exactly the best way to apply it for optimum results. Sadly, in today’s business world, those are not common traits. It definitely was a pleasure to do business with you ( as cliche as that saying is.) I definitely will recommend to anyone who needs your products. Best wishes for continued success. Sincerely, Julie" (6/2019)
"Paul, Finally got my top poured, your product is AWESOME. I was hesitant with all I read about go small first, my top was 8'x2'6"x1/4". I'm the "Go big or go home" guy, this top was my first pour & I feel that your product made it as easy as it could be. I was very surprised at the lack of fumes, I poured in a different location & could have just poured in the store where the counter is going."
"I appreciate your help, and especially that you are available by phone...and answer the phone. Thanks again". ---- Tim 9/16
"The Right Epoxy fixes Everything!"
Visit our Subject / Catalog contents PAGE