PROGRESSIVE EPOXY POLYMERS, INC.
GOOGLE SITE SEARCH - Click here
Nothing but Quality Products at Good Prices, Great Customer Service, and Lots and Lots of Helpful Information
and NO SALES TAX - You are shopping in TAX FREE New Hampshire
CALL 603-435-7199 (or email).We are the only technology based coating/epoxy/resin company that actively encourages your phone calls, not just during our East Coast work hours but also after/before hours, evening, weekends and even holidays. We're available when you are. We form a personal relationship with our customers and freely share technical information, how to-advice, product information and tips-and-tricks. Speak with a non-salesman technical professional with over 25 years of experience in the resin/coating/epoxy industry (no newbie staffer on the phone lines!). Floors, tables, boats, leaks, rot repair. We handle it all! We are an 'always available,' one-on-one, technical/scientific, coating company (watch our video). We are NOT one of those fluffy/slick mass sales firms the dominate the internet selling cheap third party (made in China???), low end epoxies and coatings with no real knowledge of what they are selling and quotas to sell to as many people as possible. 603-435-7199 (east coast time).
PRIMARY STORE LINK --- TOP SELLING PRODUCTS --- EPOXY GURU HELP SITE --- EPOXY DATA SHEETS
MARINE EPOXY BOAT REPAIR
Marine Epoxy Resin Restoration of
Dinghy
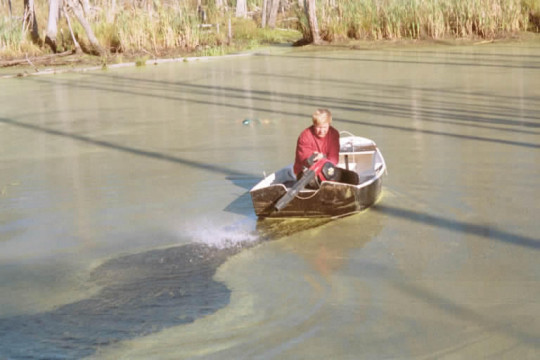
Wooden boat repair with marine epoxy resin of famous leaf blower dinghy
Your Host and Tour Guide:
Paul Oman, MS, MBA - Progressive Epoxy Polymers, Inc. (floor epoxies, marine epoxies, underwater epoxies, repair epoxies)
Member: NACE (National Assoc. of Corrosion Engineers), SSPC (Soc. of Protective Coatings), BoatUS member since 1980
"Professionals helping Professionals since 1994"
PROGRESSIVE EPOXY POLYMERS, INC.
|
PAGE AND SITE NAVIGATION |
|||||||||||||||||
Marine Epoxy Links Page ====> Part #3 Sub-Page ====> This 'Linked To' Epoxy Sub-Page
No Sales Tax applied. Save Money, you're shopping in Tax Free New Hampshire
MEMBER: Internet Epoxy Confederation (IEC - CLICK HERE TO VISIT) -- "Where Professionalism Still Matters"
We've been selling epoxy - marine epoxy (boat building - wood / fiberglass repair) industrial coatings - garage paint - underwater epoxies - thick putties - tabletop resins and supplies since the early 1990's |
Back sometime around 1996 or 97 I build a "stitch and glue" dinghy using 1/4 exterior plywood and
teo part marine epoxy
resin. It mostly lived upside sitting in the mud at a 'dinghy' landing in a marina on Clear Lake in Kemah, Texas
(which produced some minor rot on the tips of the transom and bow plate). In 2000 I moved myself and the boat to
Central New Hampshire and in 2001 or 2002 I set the afloat in a small pond in the back of my property. It was there
that the boat had a few moments of fame when I posted on the internet pictures of it buzzing around the pond powered
by a gasoline leaf blower.
More pictures - click
here
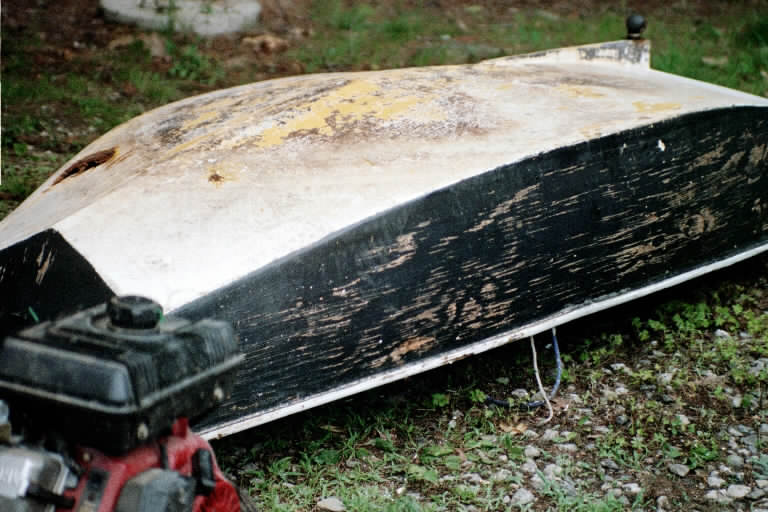
Bailing out rainwater from the dinghy resulted in most of the paint in the bottom of the boat being scraped off.
After the "leaf blower" season, the boat lived upside down in a wooden boat rack in my backyard.
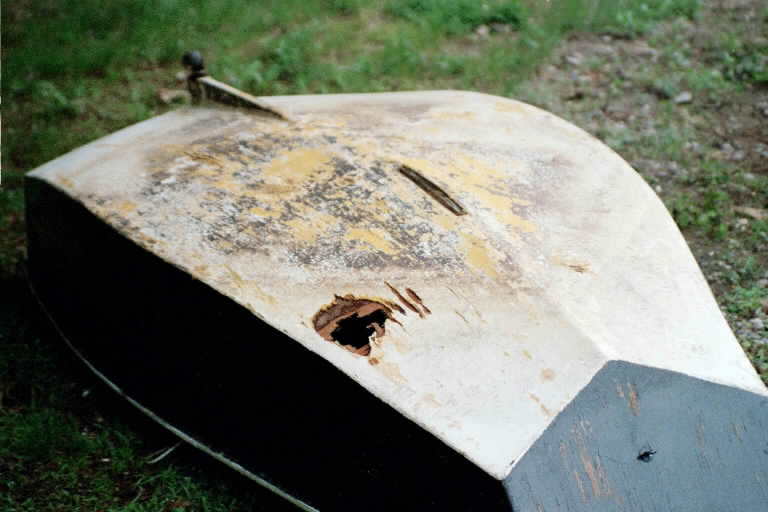
This past spring/summer I decided it was time to repaint the 'floor' and perhaps the hull which was starting to
show 'checking' or tiny splits in the plywood panels. I pulled the boat off the rack and turned my water blaster
on it to clear off any loose paint. To my horror, I blasted a 5 inch by 5 inch hole through the bottom of the boat!
Also, another 1 inch square hole just below the aft starboard rail! Clearly a more complete restoration was needed!
Note that I am in the marine and industrial epoxy business (Progressive Epoxy Polymers, Inc. - www.epoxyproducts.com/marine.html) so I have lots of epoxies
and related products available in my workshop (at no cost!) to restore my first stitch and glue 'mini-yacht'.
Below is the methods and products I and using (used) in the restoration which took place in my garage June and
July 2004.
1) I water blasted the hull to remove loose paint, dirt etc. (note this was done already and lead to the holes in
the weak spots of the hull.
2) I let the hull dry a few days in the garage. I then turned it upside down on saw horses and began to get to work.....
3) I coated the exterior hull with one coat of our EPOXY PRIMER (replaced with ESP 155). This is a white pigmented, high solids epoxy primer and sealer. It was sort of like painting the hull with milk. The idea was to penetrate and seal the tiny cracks in the plywood, provide a fresh and clean bonding surface for forthcoming patch, repair, and coating products. It took about 15 oz of EPOXY PRIMER to coat the exterior of the hull. This product is a Progressive Epoxy Polymers, Inc. best selling, favorite product. Visit our FAVORITES - 7 EPOXIES THAT WILL FIX ANYTHING web page at: epoxyproducts.com/favorites4u.html View other popular one-of-a-kind products.
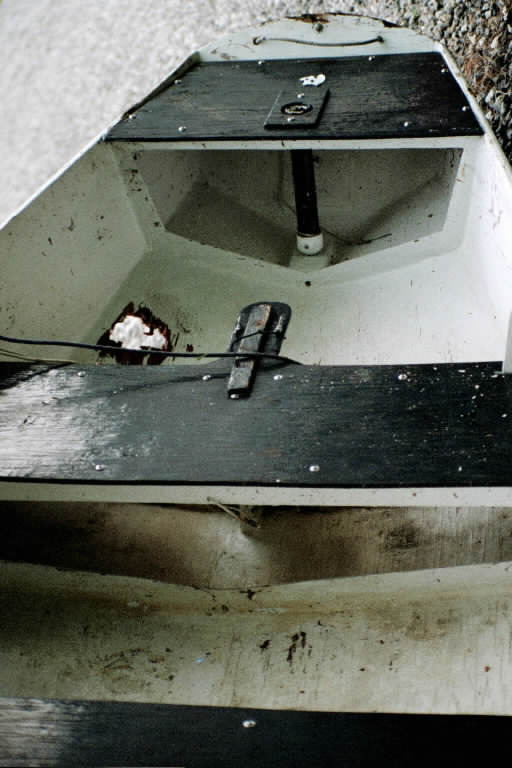
4) Using a saw I cut away a lot, but not all, of the splintered wood around the two holes. I wanted some of the splintered wood in place to increase the epoxy to wood bond area. I then recoated the 'holes' with a bit more of the EPOXY PRIMER and let it cure for a day or so.
5) I duct taped wax paper over the two holes on the convex (exterior) side of the hull and turned the boat over (upright) so I could work on the holes from the inside of the hull.
6) I cut some of our 9 oz. FIBERGLASS TAPE (from rolls 3 inch wide by 50 yards long) into pieces 3 to 7 inches long - about 10 or 12 pieces total and epoxy fiberglassed closed the holes (which were 'backed' with the duct taped wax paper). Each hole got about 3 layers of fiberglass cloth. I used our BASIC NO BLUSH marine epoxy for the repair. This product is a Progressive Epoxy Polymers, Inc. best selling, favorite product. Visit our FAVORITES - 7 EPOXIES THAT WILL FIX ANYTHING web page at: epoxyproducts.com/favorites4u.html View other popular one-of-a-kind products.
We really appreciate you visiting PROGRESSIVE EPOXY POLYMERS, INC. and our web site: EPOXYPRODUCTS.COM. Take advantage of the CONTACT links on this page to ask questions about our products and/or your projects. You can stay in touch with us via our NEWSLETTER (link on our contact page) which is emailed every 6-8 weeks.
|
Epoxy Only Web Google Search |
|
 |
#1) Google Everything Epoxy Searches #2) Google Marine Epoxies Searches
#3)Google
Floor Epoxy Searches |
|
View our Progressive Epoxy Products, Inc. |
This current page is all about:
Marine Epoxy Resin Restoration of
Dinghy
Wooden boat repair with marine epoxy resin of famous leaf blower dinghy
"The Wet Dry 700 epoxy paste worked great for patching for the rotted dingy transom. I cut out the rot, fitted new oak pieces, and patched with the Wet Dry 700 epoxy. Easy as pie." -- John 1/15 BUY
|
|
WOW! 35% - 40% of all daily online or telephone orders are from existing customers. That's an amazing 'REPEAT CUSTOMER" number. |
|
603 - 435 - 7199 ANYTIME 24/7 FOR HELP OR ORDERS |
|
|
|
|
7) When the epoxy had cured hard I turned the boat upside down again and removed the duct tape and wax paper, exposing my epoxy fiberglass repair.
8) I then mixed up a batch of our epoxy gel/putty (FILLET QUICK - a thickened epoxy we no longer sell) and using a putty knife filled any chips, holes, dents, and missing layers of plywood (there were lots of these in the bow plate and transom where rot had taken hold). I also faired around my patched holes filling in low spots and places were the epoxy had not filled in. After it had cured, a quick and dirty sanding with my belt sander, a bit more epoxy putty in spots I missed. (Fillet quick is no longer available use Wet Dry 700 epoxy paste or just thicken the Basic No Blush with EZ thick thickener).
9) I turned the boat right-side up again and repeated step 3 - coated the entire interior with EPOXY PRIMER, then step 8 - FILLET QUICK epoxy putty on voids, holes and around my new fiberglass patches.
10) With the boat upside down again, I painted the exterior with our CM15 epoxy paint. CM15 is a solvent based epoxy paint and primer with lots of flex (so necessary on a 1/4 inch plywood hull). I used about 1.5 quarts to paint the exterior of the 8 ft dinghy. With the beige CM15 now encasing the hull in a uniform manner, I could see places that need more cosmetic putty and fairing. NOTE: the CM15 has a long potlife and behaves more like a 'regular' paint than other epoxy paints (which are kind of like painting with honey). It's tendency to sag probably a little bit more than that of 'regular' paint.
11) Using exterior grade putty from the hardware store (much easier to sand) I finished fairing the exterior of the hull back to my satisfaction....
12) The entire interior, including seats, were also coated with CM15. Total amount of CM15 to coat interior and exterior of the boat was approximately 1 gallon. (leason learned I would use the Epoxy Primer on all plywood surfaces when building any future boat). Exterior putty was used to as needed for more cosmetic putty filling and fairing.
13) A missing 10 inch section of railing near the bow was replaced. I used 1/4 round mounding as the original and replacement railing. The replacement section was epoxy glued in place with our kevlar reinforced WET DRY 700 epoxy putty. Additonal fairing and smoothing of this section of rail and all the other railing was done with regular exterior putty. This product is a Progressive Epoxy Polymers, Inc. best selling, favorite product. Visit our FAVORITES - 7 EPOXIES THAT WILL FIX ANYTHING web page at: epoxyproducts.com/favorites4u.html View other popular one-of-a-kind products.
14) A few hours of sanding the putty, CM 15, repairs, etc. is next, followed by cosmetic painting.
15) Over the CM 15 the original paint scheme was repeated - Black topsides and seats, white everywhere else. I used exterior water based latex with the following exceptions:
I wanted to test our rubber co-polymer paint so the entire bottom of the dinghy (about 25 square feet) and the
Floor Board section (inside bottom) of the boat was coated with the white co-polymer (no longer available).
I wanted to test our moisture cured aluminum filled urethene (aluthane) so the underwater skeg and a few sections
of the Floor Board area inside the boat were painted with the aluthane
Note the boat will be moved to my swimming pool sized duck pond and sit in the water for weeks. I will see how
the coatings on the bottom hold up. The same coatings on the inside will suffer from sun and the bailing bucket.
|
Aluthane (tm) - an MCU sealer/tie coat/color changing sanding base. Use when restoring Wood, Fiberglass, or Metal hulled boats. ALUTHANE. |
|
Epoxy Crazing Notice/Warning |
|
There are two types of Marine Epoxy Vendors: 1) discount, bulk, REPACKAGERS who simple buy drums of raw resin and raw curing agent(s) from the big chemical companies and fill plastic jugs for resale; 2) FORMULATORS take the raw epoxy chemicals add to them to enhance and improve the raw "moonshine" into a "fine whiskey". Learn more repackagers/formulators. Our Basic No Blush (tm) is a formulated non blushing epoxy by Progressive Epoxy Polymers, Inc. (homepage). that includes additions for reduced brittleness and exclusive (only we have it) bubble breakers for a more perfect looking finish. Basic No Blush is the least expensive of the formulated epoxies and considered the best marine epoxy by many ex-users of the other formulated epoxies. REPACKAGED EPOXY WARNING: Over the years I have seen and had reports of non-formulated, raw resin/cure epoxies (which are extremely hard and brittle) becoming crazed with millions of cracks (like shattered safety glass) in outdoor settings that experience big changes in temperature. Formulated epoxies all seem to be 'fixed' to allow for this expansion and contraction without cracking by making them less brittle and better able to handle internal stresses. |
|
Marine Catalog ///// Stitch n Glue ///// Epoxy Only Google Search ///// Epoxy Guru Help Site ///// Marine Boat Epoxy Etc. Links |
| "I've been using the Basic No Blush epoxy on all my own stuff, and using up all the West epoxy on most customers boats. When the West is finally gone I'll only be using your epoxies. Good stuff. I'm rebuilding an old Rybovich so a big order in the future..." Patrick (comment with on-line order 9/4/07) ---- Order No Blush online |
|
The Marine Epoxy Everything Guide Everything from user reviews, repair examples, pricing issues and vendor evaluation tips
Basic No Blush Marine Epoxy Product Page Marine Epoxy Catalog page (multiple epoxies) Basic No Blush Marine Epoxy User Reviews / Feedback How To Evaluating Marine Epoxy brands and Vendors Marine Epoxy prices - what it really costs! Marine Epoxy amine blush - what is epoxy Blush? Boat repair examples using Marine Epoxy Dinghy Marine Epoxy boat repair case study Progressive Epoxy Polymer's marine web site Massive site of Internet boat links
|
Inside Our Marine Catalog:
Section One TWO PART MARINE EPOXIES- CLEAR EPOXIES
basic no blush epoxy, premium no blush epoxy, esp 155 epoxy, low v epoxy
Section Two FILLERS THICKENERS ADDITIVES
fumed silica; microsphere/balloons; poly fibers; graphite, wood flour; EZ thick; rock flour
Section Three THICKENED EPOXIES - EPOXY PUTTIES, ETC.
wet/dry 700; splash zone; epoxy cream; splash zone a-788
Section Four TWO PART EPOXY PAINTS (barrier coats)
corro coat FC 2100; water gard 300; CM 15; liqua tile 11 72 potable water; rough coat; water prime
Section Five URETHANES AND NON-EPOXY COATINGS Aluthane (aluminum coating); LPU Marine; india spar varnish; acrylic poly uv plus, polyester poly
Section Six NON-SKID DECK COATINGS
walnut shell,; s15
Section Seven MARINE REPAIR PRODUCTS
pipe wrap; fiberglass tape (cloth); Capt. Tolley's Creeping Crack Cure
Section Eight MISC. MARINE PRODUCTS
short nap rollers; TA 661 (solvent free epoxy clean-up); 1 inch foam brushes; 2 inch bristle brushes; tongue depressors
Questions? / Phone order? / EMAIL / CALL 603-435-7199 EST / BUY ONLINE
GOOGLE SITE SEARCH - Click here Epoxy specific site search
Click here - YouTube video. Learn about Progressive Epoxy Polymers Inc.
Click here - Dozens of boat repair info links across the internet. - (everything is here!)
THREE MUST READ WEB PAGES
MPRICES - 2 part marine epoxy pricing issues - CLICK HERE -
MEPOXIES - comparing 2 part clear marine epoxies - CLICK HERE - (you are here already!)
EVAL4U - how to evaluate your marine/non marine epoxy vendor - CLICK HERE -
Epoxy Only Web Google Search
#1) Google
Everything Epoxy Searches
#2) Google
Marine Epoxies Searches
#3)Google
Floor Epoxy Searches View
our Progressive Epoxy Products, Inc.

 |
 |
 |
||
|
site master |
protagonist |
ground zero |